Website News Archive: October 2009
28 October 2009
Owing to a surfeit of real life to deal with recently, including a two-day technical seminar to attend for work, I haven't done any modeling recently. However, I have been utterly flummoxed by a repeat of the viral video episode from last month concerning my world's smallest train layout. For the details, see my latest blog entry.
Incidentally, the quotes attributed to me in several of the online articles are not real; they were "adapted" from a twenty-minute phone conversation. I never said, "It is going to be a model train village inside a model, so it is very postmodern." Nor did I say, "It has taken up two and a half years of my life and is going to be very impressive once it is finished." People who know me would realize this stuff is made up; I simply don't talk like that!
23 October 2009
Although I've not had much time today for modeling, I noticed that I've been blogging away but not linking there from here, and the last several posts are relevant to recent modeling efforts. If you haven't been to my blog lately, here are some entries of potential interest:
- A Collage of Life examines the many real-world inspirations behind the recently-paved River Road (which, by the way, is currently featured at Ztrains).
- Knowing One's Limits explains why I've abandoned plans to pursue DIY metal etching.
- Event Horizon deconstructs my motives for adding a mirror to the James River Branch.
- Humor in Modeling considers how some of us work amusing things into our layouts.
- Finding Flaws looks at how I try to improve my modeling.
22 October 2009
 It's time for just a bit of "destruction."
No, they layout isn't being trashed; I'm clearing space for the mirror, which entails removing a
slice of scenery so that it can be set into the layout about a half-inch. This is necessary so that the reflection of the bridge piers
is correct: if the mirror was simply placed behind completed piers, they would then be doubled in size. So the idea is to make
half-piers and let the mirror complete them; the bridge surface, however, is being modeled in full (to hide the top of the mirror),
which means the mirror will run under the center of the bridge. It all sounds much more complicated than it really is, trust me.
And once the mirror is in place, I can finish the rest of River Road—as well as everything around it.
It's time for just a bit of "destruction."
No, they layout isn't being trashed; I'm clearing space for the mirror, which entails removing a
slice of scenery so that it can be set into the layout about a half-inch. This is necessary so that the reflection of the bridge piers
is correct: if the mirror was simply placed behind completed piers, they would then be doubled in size. So the idea is to make
half-piers and let the mirror complete them; the bridge surface, however, is being modeled in full (to hide the top of the mirror),
which means the mirror will run under the center of the bridge. It all sounds much more complicated than it really is, trust me.
And once the mirror is in place, I can finish the rest of River Road—as well as everything around it.
21 October 2009
After answering the umteenth email about where to buy motors—which is matched by an equivalent number of requests for sources of LEDs and whatnot—I've finally assembled a collection of links. The only issue I faced was one of organization: American Z Scale constitutes a stand-alone website devoted to American-prototype products, which would not be the appropriate place for motor, LED and widget resources; so, the latter resides within the James River Branch website. The links on my new Online Resources page are all organized and described for your convenience. The resource will of course continue to grow as I accumulate more resources.
In other news, I'm still working on an update for my Z Scale Truck and Coupler Review; it's much more work than I'd anticipated since I have three new products to review and add—never rains, but it pours!
20 October 2009

 |
As I anticipated, paving River Road opened up a slew of items that could be completed, in particular the fence along the lumber yard, and the surrounding terrain. I used the fence material from the Lew Skroo's Hardware kit—modified, of course. As designed, the fence is mounted flush on a flat base, which leaves zero opportunity to bring scenery right up to the fence, much less under it. I also wanted it to be slightly less-beat-up, so I clipped some of the best sections from the kit parts, and also combined pieces of framing to produce a one-piece fence with long legs that were inserted into holes punched into the layout. Once the fence was erected, I spread gravel around and under it, then bonded everything together. After this was all done, I finished the fence with stains and washes. Finally, I took a nice photo of it.
18 October 2009


 |
All of the recent activity along River Road finally got to me: I had to finish the road itself; I had no excuse not to. Step one was making a paper template. It took about five tries to get one piece that exactly fit correctly. This was traced onto .030-inch thick black styrene, and cut out. After a quick test-fit, I went to work distressing the surface of the road with sandpaper and a sharp knife. Then it was off to the garage for a coat of paint. Actually, two: I wanted to give the surface the look of visible aggregate that some roads have, and I think I was successful—after applying the base coat of light grey primer, I misted on some darker grey primer while the base coat was still wet.
When the paint was dry, I applied stripes with colored pencils. I was deliberately a little sloppy—a road I take to work recently had its stripes repainted, and the crew must have just come from the local watering hole. Also, since my road narrows down from two lanes to one and a half to squeeze under the railroad bridge, the stripes simply end as the road dips under the bridge. Then I brushed on powdered chalk to add typical weathering as well as differences in road coloration for some patches.
With the road ready to install, I mixed up a batch of my special road goop: caulk, black powdered dye, and Z scale ballast. I applied a layer of this along the Foamcore roadbed, spending close to an hour working it into the shoulder along the cable guardrail. Then I simply placed the finished road on top of the goop, pressed it in a little, and removed the excess along the edges. I still have some tidying up to do to the shoulders. Now that most of River Road is at long last finished, I can continue on with the surrounding scenery at full speed. Of course, I only finished the front part of the road—it comes to a stop at the grade crossing. But the rest can only be completed when I've finished installing the new mirror. It's always something...
17 October 2009

 |
With scenery under way around the newly-installed retaining walls by the station, it became apparent that the crossing shanty I'd built for the Canal Street crossing, and subsequently moved to River Road because of the crossing flashers, wasn't going to fit there, either. I wasn't hugely disappointed, though, because I didn't like the shanty located on River Road. It was a rural road that likely wouldn't have had a crossing shanty like this one, which really belonged in a town; the shanty was also in a location that made it almost impossible to see. Yet for some strange reason I was really reluctant to let the shanty go, even though I'd gone to the trouble of rotating the shanty on its pole to make the lattice more visible; I'll learn to live with it the "wrong" way—easier than changing it again.
So, I began scrutinizing the Canal Street crossing area, and concluded that, with the footing chopped down to a bare minimum, I could shoehorn it in very close to its old spot. Once it'd been returned there, I felt it was back where it belonged—it just looked right, much the same way that Dot's "Trackside" Diner (as it was named at one point) really belonged across from the station, and not down next to the lumber yard, where it almost got installed (I'd gotten as far as preparing the space for the foundation). Sometimes I really do get some pretty goofy ideas in my head; luckily I seem to come to my senses just in time. Now, however, I have an issue to resolve with the recently-installed telephone pole, which stands immediately across from the street from the shanty, in what has become a completely illogical location. I'll need a new home for the pole...
15 October 2009
 After a fit of what I can only describe as
solo brainstorming, I've decided to add a mirror to
the layout to extended the river 'round the bend (although some may think it's me that's gone 'round the bend). Of course all
of this will mean another round of changes for the layout—this time fairly substantial—which includes altering the far end of
Front Street, revising some of the finished scenery on the other side of the river, and building a road bridge to disguise the
top edge of the mirror. The James River Branch is becoming more like my place of employment every day, where the only constant
is change. In other news, there may yet be hope for my
MP-15DC.
After a fit of what I can only describe as
solo brainstorming, I've decided to add a mirror to
the layout to extended the river 'round the bend (although some may think it's me that's gone 'round the bend). Of course all
of this will mean another round of changes for the layout—this time fairly substantial—which includes altering the far end of
Front Street, revising some of the finished scenery on the other side of the river, and building a road bridge to disguise the
top edge of the mirror. The James River Branch is becoming more like my place of employment every day, where the only constant
is change. In other news, there may yet be hope for my
MP-15DC.
13 October 2009
 A tiny bit of progress: just enough time
to install an iron fence on the new stone wall along the side of the station parking lot.
It may not be much, but it certainly adds a finishing touch to the area. The etched brass fence is from Miller Engineering,
#Z-F-404 Gothic Style Fence. I sprayed it with ruddy metal primer, followed by a misting of Floquil Weathered Black; after
securing it in holes drilled in the wall with CA, I streaked the stone with Doctor Ben's Weathered Rust. Incidentally, the
level of the earth will rise up to just cover the arched portal stones, so it won't look like the station is built over a
giant culvert—although it would not be outside the realm of possibility in real life.
A tiny bit of progress: just enough time
to install an iron fence on the new stone wall along the side of the station parking lot.
It may not be much, but it certainly adds a finishing touch to the area. The etched brass fence is from Miller Engineering,
#Z-F-404 Gothic Style Fence. I sprayed it with ruddy metal primer, followed by a misting of Floquil Weathered Black; after
securing it in holes drilled in the wall with CA, I streaked the stone with Doctor Ben's Weathered Rust. Incidentally, the
level of the earth will rise up to just cover the arched portal stones, so it won't look like the station is built over a
giant culvert—although it would not be outside the realm of possibility in real life.
11 October 2009
 Thanks to a combination of a slightly
aged—hence comparatively slow—PC and a glitch in YouTube, I unexpectedly spent more of my weekend being a frustrated video
producer than a modeler. I was inspired to continue building my library of
steam railroad videos, and decided to try making
a high-quality widescreen video. That bumped up rendering time to an outrageous nine hours for a 6-1/2 minute
video, plus another hour and a half to upload... only to find that YouTube has a known bug that truncates certain files,
and my video was downsized to 4-1/2 minutes. So I cut the video shorter, and tried again. No joy; my shortened video was
still truncated. To say that I'm rather frustrated is an understatement.
Thanks to a combination of a slightly
aged—hence comparatively slow—PC and a glitch in YouTube, I unexpectedly spent more of my weekend being a frustrated video
producer than a modeler. I was inspired to continue building my library of
steam railroad videos, and decided to try making
a high-quality widescreen video. That bumped up rendering time to an outrageous nine hours for a 6-1/2 minute
video, plus another hour and a half to upload... only to find that YouTube has a known bug that truncates certain files,
and my video was downsized to 4-1/2 minutes. So I cut the video shorter, and tried again. No joy; my shortened video was
still truncated. To say that I'm rather frustrated is an understatement.
 Meanwhile, since a tentatively planned
family cookout never materialized, I made use of the unexpected spare time for modeling. Although I began with the intention
of finishing the roof for the lumber yard building, things took an unexpected turn when
I rotated the layout to get better access to the little retaining wall installed under the deck
bridge pier, at the back of the building supply property. That's when I decided instead to take care of a couple of
round tuits I spotted. First, I bonded some ballast and talus in a gap along the retaining wall for the
plate girder through bridge (above). Then I ballasted the lower line between the bridge
and the River Road grade crossing (below) where it crosses the concrete culvert, a.k.a. Crooked Creek.
Meanwhile, since a tentatively planned
family cookout never materialized, I made use of the unexpected spare time for modeling. Although I began with the intention
of finishing the roof for the lumber yard building, things took an unexpected turn when
I rotated the layout to get better access to the little retaining wall installed under the deck
bridge pier, at the back of the building supply property. That's when I decided instead to take care of a couple of
round tuits I spotted. First, I bonded some ballast and talus in a gap along the retaining wall for the
plate girder through bridge (above). Then I ballasted the lower line between the bridge
and the River Road grade crossing (below) where it crosses the concrete culvert, a.k.a. Crooked Creek.
 I was about to get back to work on what
I'd originally intended to do—finishing the little retaining wall at the back of the building supply property—when I noticed a
construction flaw in the bridge abutment at the end of the station platform. It somehow wound
up getting installed at an angle to the track, rather than perpendicular. As I contemplated repairs, I started going even further
off-script, and instead of repairing the abutment, I wound up building the large retaining wall at the end of town, which turned
into something of a make-it-up-as-you-go-along modeling free-for-all project.
I was about to get back to work on what
I'd originally intended to do—finishing the little retaining wall at the back of the building supply property—when I noticed a
construction flaw in the bridge abutment at the end of the station platform. It somehow wound
up getting installed at an angle to the track, rather than perpendicular. As I contemplated repairs, I started going even further
off-script, and instead of repairing the abutment, I wound up building the large retaining wall at the end of town, which turned
into something of a make-it-up-as-you-go-along modeling free-for-all project.
 Originally it was going to be all Pre-Size stone
walls assembled to make a zigzag at the station parking lot with two right-angle corners. Instead, I completely changed the design,
rounding the corner of the street and bending the stone wall into a matching curve. Then, rather than continue the Pre-Size wall
material across the end of the station parking lot, I switched to a piece of Chooch cut stone extracted from an N scale tunnel
portal. I thought that it would be more visually interesting, and that it might also suggest a bit of history, that the town
evolved and the area changed over time.
Originally it was going to be all Pre-Size stone
walls assembled to make a zigzag at the station parking lot with two right-angle corners. Instead, I completely changed the design,
rounding the corner of the street and bending the stone wall into a matching curve. Then, rather than continue the Pre-Size wall
material across the end of the station parking lot, I switched to a piece of Chooch cut stone extracted from an N scale tunnel
portal. I thought that it would be more visually interesting, and that it might also suggest a bit of history, that the town
evolved and the area changed over time.
Consequently, this area of the layout is turning out better than expected, which is always a pleasant surprise. I still have work to do on the walls, including adding a variety of railings: some kind of (etched brass) old iron fence for the old cut stone wall, which will nicely contrast the pipe railing planned along the street (which will now have to be curved—a modeling challenge!), and then a conventional steel guardrail along the back of the station parking lot. Oh... and I never did get around to finishing the little retaining wall or fixing the bridge abutment!
10 October 2009
 I've been having trouble deciding on a color
for the lumber yard building. I'd originally wanted it to be cream, but I found that it doesn't
photograph very well—it's annoyingly sensitive to changes in the color temperature of the lighting, shifting from mustardy-grey
to yellowish-green. I'd thought about just making it green, but I felt this might be a bit "obvious" for a business
named Stephen A. Greene and Sons... so I changed the cream to a kind of warm yellow-orange, but didn't like it at all. Then
I tried brick red, but this made it look like it had a run-in with a make-up artist on drugs. In a fit of frustration, I re-sprayed
it with grey primer and finally went with the obvious. Yep, it's green. Jim should be proud. (I left
the outbuilding a yellowish cream, since it doesn't matter if it doesn't look all that great, and it makes a nice contrast with the
main building.)
I've been having trouble deciding on a color
for the lumber yard building. I'd originally wanted it to be cream, but I found that it doesn't
photograph very well—it's annoyingly sensitive to changes in the color temperature of the lighting, shifting from mustardy-grey
to yellowish-green. I'd thought about just making it green, but I felt this might be a bit "obvious" for a business
named Stephen A. Greene and Sons... so I changed the cream to a kind of warm yellow-orange, but didn't like it at all. Then
I tried brick red, but this made it look like it had a run-in with a make-up artist on drugs. In a fit of frustration, I re-sprayed
it with grey primer and finally went with the obvious. Yep, it's green. Jim should be proud. (I left
the outbuilding a yellowish cream, since it doesn't matter if it doesn't look all that great, and it makes a nice contrast with the
main building.)
9 October 2009
 Jim Greene is
finally safe! One of the many benefits of starting over with the lumber yard building is that
Jim has been moved from the very edge of the layout—where he was literally knocked off his feet a couple times a week—to
being tucked safely away in the inner corner of the building. He's a bit harder to see (and a lot harder to photograph),
but at least he won't run the risk of being lost—he's been a very lucky guy for having been safely retrieved from the floor every
time he was knocked loose.
Jim Greene is
finally safe! One of the many benefits of starting over with the lumber yard building is that
Jim has been moved from the very edge of the layout—where he was literally knocked off his feet a couple times a week—to
being tucked safely away in the inner corner of the building. He's a bit harder to see (and a lot harder to photograph),
but at least he won't run the risk of being lost—he's been a very lucky guy for having been safely retrieved from the floor every
time he was knocked loose.
8 October 2009
 Every so often I hit some sort of modeling
speed bump and get all discombobulated. This time it was white decal paper: I thought I still had some left, but I'd run out.
Worse, apparently I disposed of the spare building supply signs, likely thinking back when I'd
applied one to the Lew Skroo's building that I was essentially finished. So, the lack of white decal paper brought both the lumber
yard building and a new secret project to a sudden and unexpected—though temporary—standstill. So now I've switched gears and gone
to work on the scenery around the lumber yard. This involved making some steps for doors, and applying and bonding a layer of ballast
around the foundation. It was slow-going, though, because my thoughts were still swirling around the things I was unable to do...
Every so often I hit some sort of modeling
speed bump and get all discombobulated. This time it was white decal paper: I thought I still had some left, but I'd run out.
Worse, apparently I disposed of the spare building supply signs, likely thinking back when I'd
applied one to the Lew Skroo's building that I was essentially finished. So, the lack of white decal paper brought both the lumber
yard building and a new secret project to a sudden and unexpected—though temporary—standstill. So now I've switched gears and gone
to work on the scenery around the lumber yard. This involved making some steps for doors, and applying and bonding a layer of ballast
around the foundation. It was slow-going, though, because my thoughts were still swirling around the things I was unable to do...
4 October 2009
 I'm back to work on the
lumber yard, after a nice break adding details and knocking a few round tuits off the
list. Except for the roof, the main structure is finished, which allowed me to fabricate the foundation. I also moved the
light over the door from the back of the building (which used to be the front), where it
couldn't be seen at all, to the inside corner of the L-shape, where it can at least be glimpsed from above.
I'm back to work on the
lumber yard, after a nice break adding details and knocking a few round tuits off the
list. Except for the roof, the main structure is finished, which allowed me to fabricate the foundation. I also moved the
light over the door from the back of the building (which used to be the front), where it
couldn't be seen at all, to the inside corner of the L-shape, where it can at least be glimpsed from above.
3 October 2009
 After seeing the
railfan photographer online, I came to the conclusion that the camera needed some improvement, so I made a new one
(it's no big deal—it only took a few minutes). What bothered me was the lens: the tapered shape didn't look convincing. The
new lens is a piece of .010 wire inserted into a bit of .015 OD stainless steel capillary tube. In addition to beefing up the
how-to article, I also took a better photo using my DSLR. Getting the shot required 68 mm worth of extension tube (in lieu
of a costly macro lens). Extending a lens that far precludes using Helicon Focus, because the range of focus then drops to near
zero; but in this case, it looked natural owing to the composition. I liked it enough that I added it to the
Gallery.
After seeing the
railfan photographer online, I came to the conclusion that the camera needed some improvement, so I made a new one
(it's no big deal—it only took a few minutes). What bothered me was the lens: the tapered shape didn't look convincing. The
new lens is a piece of .010 wire inserted into a bit of .015 OD stainless steel capillary tube. In addition to beefing up the
how-to article, I also took a better photo using my DSLR. Getting the shot required 68 mm worth of extension tube (in lieu
of a costly macro lens). Extending a lens that far precludes using Helicon Focus, because the range of focus then drops to near
zero; but in this case, it looked natural owing to the composition. I liked it enough that I added it to the
Gallery.
1 October 2009
 Continuing in the same vein as the
station renovation scene, I created another fun mini-scene—more like a nano-scene,
really—that features Yours Truly in a Hitchcockian appearance on the layout as a college-age
railfan photographer shooting some lineside details. (Had the James River Branch actually
existed, the scene could have been straight out of reality.) The project also inspired a fun little Photoshop exercise
depicting the imagined outcome:
Continuing in the same vein as the
station renovation scene, I created another fun mini-scene—more like a nano-scene,
really—that features Yours Truly in a Hitchcockian appearance on the layout as a college-age
railfan photographer shooting some lineside details. (Had the James River Branch actually
existed, the scene could have been straight out of reality.) The project also inspired a fun little Photoshop exercise
depicting the imagined outcome:

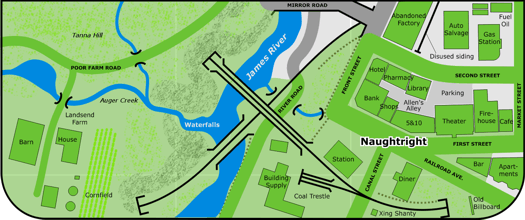
In other news, just for kicks I decided to add an illustration to the page for the Plan that visually indicates what's done on the layout. I included it here so you don't have to go clicking around to see it. Finished structures and scenery are shaded green:
![]()
![]()
![]()
Copyright © 2007-2013 by David K. Smith. All Rights Reserved.