Dot's Diner, Part 1 of 3: Exterior Construction
My N Scale White River and Northern featured a Dot's Diner, and it too was a Micro Structures Parkway Diner kit, although that project did not benefit from the interior detailing and lighting kits that were made available later; I had to do all of that work from scratch. It also enjoyed much more ambitious modifications, including an all-new roof and big lighted sign.
For my Z scale layout, my plan was to save time by building it pretty much stock, using the interior detail and lighting kits. Famous last words. Originally located near the back of the layout, the diner later got moved front and center, and my notion of living with it in stock form quickly evaporated.
It's certainly not my intention to malign Miller Engineering's fine products in any way; however, this kit did not go together quite as smoothly as the instructions would lead one to expect. The interior detailing kit, in combination with the lighting kit, presented a number of minor challenges:
- The slot for the neon sign in the building front is too small, and must be enlarged.
- The main floor part must be notched around the front door to clear the neon sign's electrical connector.
- The small floor part for the entrance does not clear the door inside, and a relief must be filed along one edge.
- The back wall part does not drop down even with the side walls when installed; the sidewall parts that protrude inside the back wall must be ground down at the top.
- The ceiling illumination panel is the wrong size, and must be cut down significantly in order to fit; however, after doing so, the panel is then less than half the width of the dining area.
- The assembled walls have loads of light leaks where parts connect, which must be sealed for a better lighting effect.
I made several minor cosmetic changes to the exterior. First, the awning on the side of the building was omitted, so I filled in the mounting slots with thin strips of scrap etched stainless steel scavenged from part connectors on the fret.
The roof, as supplied, did not look finished along the back of the structure; it just ended with a plain, raw sheet metal edge, and since the back of my diner would be visible, I needed to do something to improve its appearance. I rounded off the front two corners a little with a Dremel tool, and added a stainless steel trim strip (more fret material) around all four sides. Then I applied black masking tape to the roof to simulate tarpaper. New roof details included an air conditioning unit from the City Scoop kit, and a couple of vent pipes made from thin-wall brass tubing.
The little DOT'S sign over the entrance was deliberately designed with a kind of home-grown, amateurish style to reflect the mom-and-pop nature of the business; this and other touches were gathered from studying hundreds of reference photos. I printed it on white decal paper with an inkjet printer, and applied the decals to a scrap of metal (still more fret material). The sign was bonded to the entrance roof with CA, and a piece of .005-inch brass wire was added as a stay cable—which, given the tenuous nature of the sign's bond to the stainless steel roof, serves to help secure it much the same way as its real-life counterpart.
I replaced the front set of stainless steel steps with new ones made from .040-inch sheet styrene, stacked and lightly distressed to simulate concrete, plus .010-inch steel wire railings, all bonded to a thick sheet styrene foundation. To suit the sloped contour of the diner's real estate, I also made an elevated sidewalk along the back wall, which eliminated the need for steps at the back door. After spraying the foundation assembly with Testors Light Aircraft Grey and weathering it with an India ink wash and some powdered chalks, I simply scraped the paint off the railings to reveal the natural steel color, and it was ready to install.
Finishing touches included a tiny canopy over the back door (swiped from Miller Engineering's City Scoop kit), a downspout that runs out over the retaining wall next to the tracks (not sure if that's legal!), a cinderblock retaining wall along Railroad Avenue (etched brass laminated onto thick sheet styrene), and a storm drain at the lower end of the parking area.
Here's the original Micro Structures Parkway Diner kit.

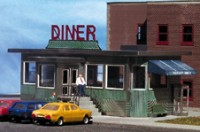
My first Dot's Diner was a higher-class establishment—and highly customized.

The mounting slots for the awning are filled in with tiny scraps of etched steel.

Thin strips of black tape are necessary in order to prevent light leaks.

The slot for the sign must be enlarged with a file.

A notch must be cut in the floor part to clear the sign connector.

The modified roof has a new trim strip all around and a tarpaper surface.

The wire rod helps hold the sign in place—for real.

A foundation, with steps and rear sidewalk, is made from sheet styrene.

After installing the foundation in the layout, the diner is placed in position.
![]()
![]()
![]()
![]()
Copyright © 2007-2013 by
David K. Smith. All Rights Reserved.
Miller Engineering product photo used with permission.