One Thing Leads to Another
This chapter might be a bit boring for some, because I'll be going into considerable detail on how I revised the layout in mid-stream, so to speak. However, some modelers might like to know what exactly goes into planning a layout, and the minutia involved in getting things to work—which can be a curious, convoluted process of discovery, inspiration and revelation. It's a mix of pure accident and careful preparation.
I love how little surprises can produce new directions, and on rare occasion the surprises can be a bit bigger and better than expected. In the process of selecting and preparing the rock molds for the left-rear bank of James River, I did a little Superman thing and changed the course of the river to better suit one of the rock molds. The river shifted to the left a few inches, and this relatively subtle change gave rise to a cascade of other changes that ultimately rippled through the entire layout.
 Naturally
the track plan didn't change, but quite a lot of other things did, beginning with the opposite bank
of the river behind Naughtright. Originally River Road was to cross the tracks on a bridge (right),
but as the access panel came into shape for the town, it started
looking like the bridge would have to go owing to lack of space. I was a bit disappointed by this,
as Monroe Models makes a nice kit that I was looking forward to building. But losing
the bridge was actually not as much a disappointment as losing the space for the section house and
lineside utility sheds, which were also now at risk. With the shift in the river, space opened up for
the sheds once again—assuming I didn't try to cram the road bridge back into the space, too.
Naturally
the track plan didn't change, but quite a lot of other things did, beginning with the opposite bank
of the river behind Naughtright. Originally River Road was to cross the tracks on a bridge (right),
but as the access panel came into shape for the town, it started
looking like the bridge would have to go owing to lack of space. I was a bit disappointed by this,
as Monroe Models makes a nice kit that I was looking forward to building. But losing
the bridge was actually not as much a disappointment as losing the space for the section house and
lineside utility sheds, which were also now at risk. With the shift in the river, space opened up for
the sheds once again—assuming I didn't try to cram the road bridge back into the space, too.
What convinced me to leave the road bridge behind was the odd form of symmetry it created. At each end of the visible portion of the lower line, the track passed through a short enclosure before entering the tunnel: in the foreground, a short bore through rock; in the background, the road bridge. Wishing to break this symmetry, I let go of the road bridge at last, and re-aligned River Road to cross the track at a grade crossing and skirt the river.
The realignment of River Road forced me to rearrange its connection to the town. Squeezing River Road under the center span of the deck bridge alongside the track made that area more interesting, and opened up the span near the town for a new road—actually an extension of First Street, which would wind down to River Road behind the coal trestle. Truncating Railroad Avenue at First Street allowed me to shift the diner—which was almost completely obscured by the bank building in the original plan—to the left and make it much more visible.
Shifting the diner created room for a whole street of houses, something I'd wanted to do from the outset but had to settle for just a few token row homes. This did away with the laundromat, pharmacy and barber shop, but as they were in the background, they would not have been easily viewed. The laundromat and pharmacy might wind up in old wooden structures that span the creek like bridges, based on buildings I know of in real life that do this. And Don & Stan's Barber Shop was relocated to the foreground, next to the Gilmore Hotel.
The introduction of a new laser kit inspired me to open up the foreground near the coal trestle a bit for Stephen A. Green & Sons Building Supply. Lumber yards have always been a favorite scene to build, but on this layout had nowhere go until now. Having already rearranged the town, the new design inspired me to swap Dick's Auto Salvage and cemetery, which would place the more interesting and detailed scene right in the foreground.
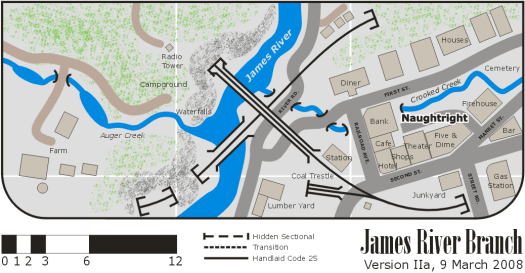
The revisions didn't stop there... on the rural side of James River, I moved the farm to the foreground, where it could be seen better. This allowed me to raise the terrain in the background and add more dramatic cliffs. By now it must sound as if I have a whole new layout; actually, if you compare it with the original plan, the changes are all cosmetic and relatively subtle, with most of the principal features more or less intact.
By the way, it may seem to some as if I'm a bit obsessed about the arrangement of roads. I am, probably, but I have good reason: years ago, a fellow modeler remarked at how realistic my layouts look, and that this was due in large part to the attention I've paid to roads. I don't add roads as an afterthought, or as token places to park vehicles; I invest a fair amount of effort in designing roads that are logical and believable. Often this entails making more roads than most modelers typically do, and imbuing them with the same kind of character and detail that good structures receive.
A trick I often employ to come up with a believable road system is to pretend I'm in a 1:160 (or, in this case, 1:220) vehicle and "drive around" the layout in my head. I expect the roads to go places that make sense. I also pay close attention to real roads when I'm driving my 1:1 car, building mental checklists of characteristics and details. Investing a little extra time in road design I believe provides big paybacks in overall layout realism.
One parting observation: the realignment of the river brought it to the back edge of the layout at 90 degrees, along with the road on its bank, where previously they were at an angle. This change may allow me to do some simple photographic tricks using a mirror: with the river and road at right angles, they will be reflected perfectly, and I'll be able to extend the scene seamlessly. Just another happy accident—and there may yet be more to come!
![]()
![]()
![]()
![]()
Copyright © 2007-2013 by
David K. Smith. All Rights Reserved.
Monroe Models product photo used with permission.