
Dick's Auto Salvage
Junkyards are perennially popular modeling subjects, and no wonder why: they're loaded with details—even better, old rusty details. I'm right in there with the rest of the junkyard junkies. Since Monroe Models' Jurgen's Junk Yard was built around a Quonset hut, it was even more appealing to me, as I've always liked these interesting structures, which are often found in industrial areas in the Northeast. My version would be an auto salvage yard, which is only slightly different from a typical junkyard, as the focus is obviously on vehicles.
I also decided to make a few modifications to the kit—anyone surprised? For starters, having a space limitation, I shortened the building. It would have fit unmodified, but the back wall would have been sitting at the very back edge of the layout, which was awkward. I simply cut the braces shorter, and left out one of the four wall sections. This made assembly just slightly tricky, since the framing process originally relied on the two center sections as the starting point.
As I assembled the framing, I realized that the front wall as well as the doors and window were attached directly to the end solid framing wall section. Now, I wasn't planning on doing any interior detailing—the windows are far too small to get a look inside—but I did want the option of possibly placing a light inside the building, and the kit's instructions of using glossy dark grey paint for glazing was not going to work. So, I re-lengthened the frame a small amount by attaching the spare interior wall section, after having cut openings for the window areas, to the end of the frame using scraps of leftover braces bonded edgewise.
However... the self-adhesive doors and windows were supposed to have been attached directly to the interior wall section, which was now full of holes. So, after blackening the spaces behind the windows with a marker, I bonded a piece of clear plastic to the interior wall section, to which the doors and window would be attached. Obviously a far "cleaner" solution could have been devised had I thought about all of this before starting on the project, but since it's all hidden anyway, the only people who'll know are you and me!
To keep the shortened building's proportion more balanced, I also shortened the height of the false-front a couple of scale feet by simply slicing off the top few boards before completing the assembly. As I usually do, I sprayed everything with primer gray paint, this time using two shades to accent the doors and trim, then tinted the surfaces with ground chalks to simulate fading colors.
The sign was made using drawing software, and printed on white decal paper with an inkjet printer. Applying the decal was no easy task—it took five tries, and the building front was beginning to warp as a result. After finally getting it on right, I applied some CA to help keep it secure, as these decals don't adhere very well. The sign was going to need some serious weathering to disguise all of its flaws, so after spraying it with matte fixative, I brushed on some ground chalk.
Lastly came the metal skin. From the day I'd purchased the kit, I've pondered what to do about the corrugated metal, which was supplied as a graphic printed on self-adhesive paper; it looked decent enough in photographs, but seeing it in person was a bit disappointing. Some time ago I'd bought a pack of N scale corrugated aluminum siding material from Builders In Scale, and I felt that it was fine enough to do the job. The trick, however, would be bending the strips crosswise, against the ribs, and this occupied my mind as I worked on the kit.
To curve the metal siding, I placed a pre-cut piece on a chunk of dense foam rubber, and rolled a styrene tube back and forth over it, applying gentle pressure, until the siding was sufficiently curved. After bonding the metal to the frame with thick CA, I sprayed it with Dull Cote to kill the shine, then applied several heavy coats of Rustall, followed by some accent streaks of Doctor Ben's Weathered Rust.
However... staring at the finished building for three days, I'd grown dissatisfied with the metal roof, especially the way it appears in photographs—the metal "glows" unnaturally. I wanted something much more subdued, something like a cross between the two reference photos. So, I took the building out to the garage and sprayed the roof with primer grey paint, then brushed on an India ink wash followed by some Rustall.
The only other modification I made to the kit was to omit the side dormers, which I didn't think would look right on the shortened building.
After installing the building on the layout, I placed a couple of derelict automobiles from The Other Lionel in the wedge of land next to it, then packed every remaining space with weeds. The abandoned boxcar adds to the neglected feeling of the space. A couple of stacks of crushed cars hide the back edge of the layout and defines the property.
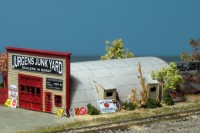
This is Monroe Models' Jurgen's Junk Yard as it appears in its original form.
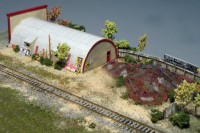
And this is the original Jurgen's Junk Yard as seen from the back.
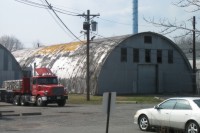
Here's a Quonset hut in an industrial area near Trenton, New Jersey.
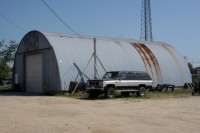
This Quonset hut is smaller and closer in size to the one I'd be building.
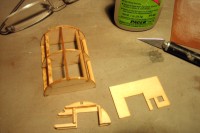
The frame is shortened and the end wall section is modified to open the windows.
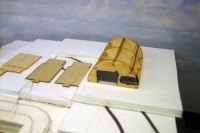
The finished frame is positioned on the layout for evaluation.
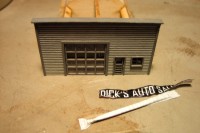
The sign was proving troublesome to apply successfully.
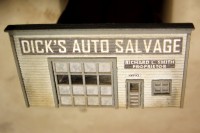
Once the sign was in place, it was weathered along with the building.
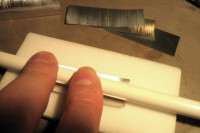
The metal siding is bent by gently rolling it between foam and a tube.
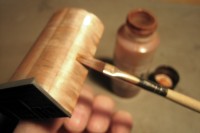
The attached siding receives several layers of different rust washes.
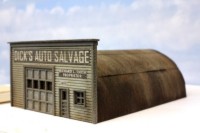
The finished building is ready for installation on the layout.
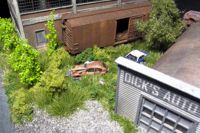
The building is surrounded by derelict autos and lots of weeds.
Copyright © 2007-2013 by
David K. Smith. All Rights Reserved.
Monroe Models product photos used with permission.