Access Panels
With two full hidden helixes, access panels were a must—just as they were with the previous version of the layout. I learned some valuable lessons back then, considering that I'd gotten as far as some nearly-finished scenery.
There was nothing wrong with the construction techniques I used for the lift-off access panels last time, so this time around I made them exactly the same way. The first step was to install vertical supports along all of the hidden track to establish minimum height clearances. These were made out of plain foamcore and glued to the base with wood glue.
Some of these parts had to follow smooth curves. The way I make these curves is to cut kerfs into one side of the foam; they are made with a single knife cut while holding the blade on a 45-degree angle. The idea is that, when the part is bent, the edges of the cut fiberboard surface slip under each other, producing a perfectly smooth bend. The sharper the curve needs to be, the more kerfs must be made; for example, the kerfs for the bend at the corner of the layout were spaced 1/4-inch apart.
With the supports in place, I made the access panels themselves from laminated layers of foamcore. The layers were cut to roughly follow the raw scenery contour, rather like a contour map, and bonded with heavy-duty spray cement. The shapes seen in the photos reflect the path of a creek through the middle of town. By the time the town and surrounding scenery is done, these contours will be all but invisible—but without question they will have helped determine the lay of the land.
One of my goals in the design of the access panels was to make them as shallow as possible so that it would appear as though the trains could not fit under them—this was done to create the illusion that the track tunnels went off in directions leading away from the layout. As a consequence, clearances got so tight in places that channels had to be carved into the underside of the foamcore.
One mistake I made previously was assuming I could establish the joints between access panel and permanent scenery precisely in advance. This led to some problems having to arrange scenery features, such as rock cliffs and waterfalls, exactly according to the pre-established joint lines. While I was ultimately able to disguise these joints fairly well, it was a lot more work than necessary.
This time around I allowed the edges of the access panels to be fluid, allowing me to shape them in order to fit scenic features, rather than the other way around. For example, I didn't know exactly where one roadway would go, but the road made an ideal natural joint. The only access panel joint that was predetermined is the portion that runs along the track in the foreground approaching the tunnel.
UPDATE: The original access panel for the town had to be rebuilt from scratch. The foamcore warped rather badly, making it difficult to establish building foundations. Also, the original panel went through several changes as the town was redesigned, multiple times; this process led to a weak and unstable structure. With the town design finally settled, the panel could follow a preset design, which resulted in a much stronger structure that would not require extensive revisions to make it suitable for the town. The replacement access panel was made from layers of warp-resistant Gatorboard. Cut precisely to follow the town's features, the layers were bonded together using Liquid Fusion urethane glue.
The access panel for the rural side of the layout supports a considerable number of rock castings which had to blend into the existing permanent castings on the layout. Plastic food wrap was used to allow the castings on the access panel to fit snugly against the existing castings; the resulting joints were tight enough that they only needed some vegetation to completely disguise them.
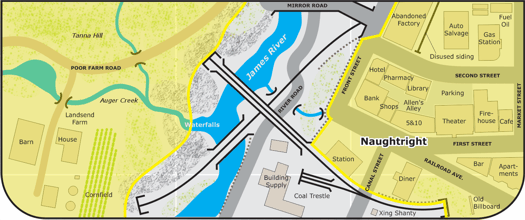
Where exactly do the panels and layout meet? The illustration below shows the dividing lines between the two panels and the layout itself. As you can see, the bulk of the layout actually resides on the panels.

The access panel supports surround all of the hidden track.

The top surfaces of the supports are cut to the minimum clearance.

The outside curve matches the shape of the layout corner.

The foamcore strips are pinned in place until the glue dries.

The access panel for the town is ready for scenery-making.

After many revisions, this panel began to warp badly and had to be replaced.

The new panel is precisely fabricated using warp-resistant Gatorboard.

The access panel for the rural side of the layout is prepared for rock molds.

Plastic food wrap is placed over the permanent parts of the scenery.

The rockwork is carefully carved by hand to blend the molds together.
![]()
![]()
![]()
![]()
Copyright © 2007-2013 by David K. Smith. All Rights Reserved.