Gilmor Hotel, Part 1 of 2: The Hotel
The Gilmor Hotel was so named strictly due to the available signs from Light Works USA (the same source as the Micro Structures kit). Although I would have chosen a different name, I was more interested in wrapping up the project as efficiently as possible and still have a working sign.
Thus the hotel constituted something of an oddity in Naughtright: an unmodified kit, with the exception of having a detailed interior complete with an animated effect: working ceiling fans. However, my decision to sell the layout did away with the animated effect option. Then, major revisions to the arrangement of the town in mid-2010 resulted in the hotel being swapped with the bank.
To accommodate the swap, the hotel was rotated 90 degrees to face the opposite corner. But this arrangement was somewhat awkward; it didn't fit the corner very well. Had the building been a mirror image, it would have fit much better. For a while I simply lived with the less-than-ideal arrangement; but then one evening, after considering the success of the cafe project, I decided that it would be worth the extra work to get what I really wanted, and set about flipping the building by breaking down all of the wall parts and rearranging them.
There was one other interesting little side benefit to flipping the hotel... When I purchased the large neon sign for the roof, I also ordered the small vertical sign for the wall. But when I realized what I'd have to do to the building to install it, I dropped the idea. Now, with the building completely dismantled, I had a perfect opportunity to include the vertical sign after all.
Although it would have been much easer had the kit not already been partially assembled, breaking it apart wasn't all that difficult. The first floor windows and doors suffered irreparable damage, but I anticipated this before I started, and I'd already investigated replacing them with leftovers from the Franklin Five and Dime project, of which I had more than enough. By happy coincidence, the K.C.'s Hardware windows and doors were a near-perfect fit as well as a good cosmetic match.
Thus it wasn't long before I was ready to start reassembly. Since the hotel was now going to face the back of the layout, I didn't invest much energy in prefecting the fit and finish of the replacement first floor windows and doors; indeed, to fill a small gap, I just added extra window columns to one end. Also, with plans to make the roof level, I sliced off the top of the long back wall in anticipation of making it straight, rather than try to reverse the direction of the wall's slope.
The reassembly process proceeded in the same manner as it has for all of my other brass bashing projects: after slicing up all of the principal wall parts, I sprayed them with ordinary spray paint to prevent solder from creeping onto the front of the wall parts and ruining the delicate detail. Once the main walls were assembled, I joined them at the corners using a jig to hold them at right angles.
The assembled shell was then given an acetone bath to clean off the spray paint and any soldering residue. Then, wall caps and a new roof were made from styrene. Finally, it was time for detailing: I made a new cornice from layers of strip styrene; then I applied new window lintels from Micron Art (#91901), and strip styrene sills. The roof received no detailing aside from the large neon sign.
After a quick vinegar bath, the building was ready for painting. First came a coat of ordinary automotive primer; this served as both a prime coat and the final brick color. I masked off the brick areas and sprayed the cornice and the first floor windows and doors flat dark brown. After applying Driftwood stain to simulate brick mortar, I brush-painted all of the second- and third-floor windows, corbels and sills with a sand-colored acrylic paint; window inserts were sprayed flat brown, installed with CA, and glazed.
Last came the signs. To accommodate the small vertical sign, I ground a notch in the edge of one wall over the door before soldering it to the adjoining wall, thus leaving a slot for the sign. After carefully inserting the sign, I glued it in place with CA. The large roof sign was installed much the same way, and after gluing it in place, I bonded supports to the back. Flat black touch-up paint completed the sign installations.
By the way, to imbue the roof sign with a little added interest, I disabled a letter to suggest old age and neglect. Prior to installation, I very carefully scraped shallow notches in the backs of the connecting parts to the R in GILMOR. This cut the letter off from the current supply.
The result was better than expected, especially considering the radical changes that were made to the kit. The neon signs bring attention to a building that faces the back of the layout.
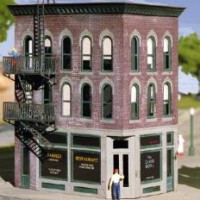
One last little detail was added to the hotel after its permanent location on the layout was at last established: the fire escape.
Miller Engineering's Gilmor Hotel is the only kit that retains its original name.

After construction had begun, I decided to make the building a mirror image.

The walls are broken apart, and new windows and doors are prepared.

Wall pieces are soldered together, and then finished walls are assembled.

The triangular opening over the door is filled in with a scrap of plain brass.

The vertical sign is test-fit in the slot made for it in the corner.

Main construction is complete and the structure is ready for painting.

After painting is done, the neon signs are installed.

Final touch-up work on the signs is done in dim light with the signs lit.

The hotel is placed in position on the layout behind the bank.

The roof sign does a good job of advertising the hotel to the whole town.

Someone needs to spend a little money to fix the sign...
![]()
![]()
![]()
![]()
Copyright © 2007-2013 by
David K. Smith. All Rights Reserved.
Miller Engineering product photo used with permission.