![]()
Heritage Crossing Apartments
This is another story of a project that has more twists and turns than a suspense novel. O'Malley's Triangle Bar has always been a part of the town since the layout's first version. But what was to go next to it has been highly variable. At the outset, the bar was located at the edge of the layout. Later, it moved inward and behind it was the gas station, the diner, a parking garage and a park.
When the bar was at last installed on its finished foundation, I decided the park didn't balance the height of the building, so I reverted back to the parking garage idea. But I then discovered that the space wasn't big enough for a garage, so it was back to the drawing board.
Inspiration for the apartment building came while I was sifting through my brass kit leftovers looking for ideas, and came across the remains of Miller Engineering's Martlet House kit. I'd purchased it at a substantial discount on eBay solely for the porch posts, which I'd wanted to use for the farmhouse. But unfortunately the kit had already been opened by someone else with the same need—all but one of the porch posts were missing.
The Martlet House walls gave me the idea to make a big old semi-fancy brick apartment building. It meant getting another kit in order to finish it, as I'd already used one wall section on a never-used clock tower for the theater, but I thought the design I had in mind would be eye-catching and worth the additional investment.
My first order of business was to make an accurate paper template of the space where the building would go; this allowed me to choose the best wall parts to fit the space, although it took me quite a while to find a combination that worked, as the space is a really odd shape. I toyed with the idea of doing a cross-section of the building where it met the edge of the layout; however, I ultimately decided against it. The reason: photography. I envisioned circumstances where the missing end wall would look awkward.
Following my usual kitbashing procedures, I trimmed the wall parts with a big old paper cutter, and sprayed them with primer to prevent solder from creeping onto the brick surfaces. The back wall was something of a problem: it comprises five narrow vertical strips butted together, and they warped rather badly as they were soldered. It took two tries to get an assembly that was reasonably flat.
Inspired by some reference photos, I was all set to apply some intricate architectural detailing, but in the end elected to keep it relatively simple. I made a plain cornice from sheet styrene, added strip styrene window sills, and called it a day. After a vinegar bath, it was ready for ruddy red automotive primer. After applying several light coats, I used Doctor Ben's Driftwood Stain to create the mortar effect.
After masking off the brick walls, I sprayed the cornice with dark suede, and the stone foundation with two shades of grey. Using a template made by rubbing paper with a pencil along the cornice, I cut a piece of sandpaper to fit the roof and sprayed it two shades of grey to simulate gravel; a pair of chimneys with TV antennas and some vent pipes completed the roof.
Windows were sprayed dark suede, installed, glazed, and fitted with masking tape window shades. This one step took the longest to complete owing to the number of windows—thirty of them! Then I brush-painted the sills with dark suede sprayed in a cup. Finally, I applied powdered chalk weathering and sealed it with Dull Cote.
Some additional detailing will come after I finish the sidewalks and the foundation: I plan to make flower beds in the three spots where the front wall is set back.

The bar needs something substantial in the space behind it.
The Miller Engineering Martlet House kit is the genesis of the apartment.

This is one example of many reference photos used for the project.

The wall parts are cut and sprayed with primer to prevent solder creep.

The assembled shell is placed on the layout for evaluation.

A styrene roof is installed that also helps maintain the building shape.

The shell is sprayed with ruddy red automotive primer.

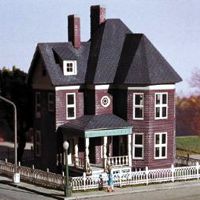
The finished apartment building is ready to install on the layout.
![]()
![]()
Copyright © 2007-2013 by
David K. Smith. All Rights Reserved.
Miller Engineering product photo used with permission.
Reference photo courtesy of Gary Friedman and is used with permission.