Spano's Service Station
Most of Miller Engineering's structure kits can be built "as-is" and look just fine. But many of them can be super-detailed to make them standout focal points. With its large windows and doors, their Gulf gas station begs to be embellished with racks of merchandise, waiting room seats, soda machines, repair bay tools, and countless other details.
Not to mention lighting! Since lighting kits are available only for the N and HO Gulf stations, I purchased the N scale kit in the hopes that parts of it could serve in Z scale. Unfortunately it wasn't a wise investment—none of the parts were useful. I was more or less on my own.
What was stuck in my mind was a photo of Miller Engineering's illuminated HO Gulf station (second image at right), where the tower is lit. In N scale, the tower is dark (third image at right), and the reason is because the N and Z scale kits are both designed with the main building roof splitting the tower horizontally in half, interfering with the installation of any lighting fixtures. In order to light the tower, I had some cutting and soldering to do.
As an added effect, I also wanted to illuminate the GULF letters on the tower. The kit has etched brass parts with raised letters that are to be painted before installation in the openings. I intended to leave these parts out so that the letters could be lit from behind.
Construction began with the tower. After the main tower part was bent and soldered, the small square roof part had to be modified to prevent it from encroaching on the open GULF letters. This involved shortening the side parts that are bent upwards; I simply filed the edges with a flat jeweler's file until they were about half their original size.
The square portion of the main building roof where the tower is attached had to be cut out; I used a nibbler tool to remove the bulk of the metal, then cleaned up the opening with files. After bending the edges of the roof, I soldered the tower into the opening created for it.
Since the Z scale kit wasn't designed to be illuminated at all, I had to carefully assess how the interior walls went together in order to accommodate a pair of custom electroluminescent lighting panels—one for the office and repair bays, and one for the tower.
To allow the building to be lit, I cut a shallow notch along the top of the center dividing wall so that a lighting panel could slide across from the repair bay to the office. With this modification made, the rest of the building was assembled per the instructions—except of course that I soldered everything. Even though the kit is designed something like a Chinese puzzle, it went together quite quickly.
Since the whole building would be painted white, I didn't need to install the windows and doors separately, so I soldered them in place—for one reason: if I botched the paint job, I could strip the building in an acetone bath, and it would be ready to repaint right away; otherwise, I'd have to reinstall all of the windows and doors.
After a nice long vinegar bath—which included a good scrubbing with a stiff brush to remove years of dirt—the gas station received a coat of grey primer, followed by a few light coats of flat white. Finally, to give the surface more of the look of enameled steel rather than just paint, I followed the white with a couple coats of clear fixative.
The final main construction steps included window glazing and light panel installation. The tower was rather tricky: to color the illuminated letters, I filled in the openings with orange transparent paint using a needle. When this was thoroughly dry, I painstakingly touched up the areas where the orange color bled with a #10 brush. Finally, I glazed the tower windows with frosted acetate, and installed the EL panel with double-stick tape.
Most of the station windows got frosted glazing, including the restroom doors, all of the windows in the repair bay, and the one roll-up door in the lowered position; the remainder of the windows received plain glazing. Once I installed the main EL panel with double-stick tape, I tested the lighting.
With two big thumbs up for the lighting effects, it was on to interior detailing and installation. This basically involved cutting a sheet of styrene to cover the entire property, distressing the exposed areas to look like concrete, and painting it. After gluing it to the layout, I traced the outline of the gas station on it, then attached the interior details to it directly. Most of the detailing consisted of people and furniture for the office; a van filled the open bay doorway, so no additional details were needed.
All that remains to do to complete the scene is add the gas pumps.
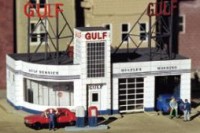
The original Miller Engineering kit will be used largely unmodified.
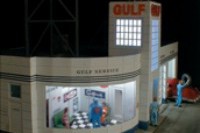
In the HO scale version, the tower is illuminated.
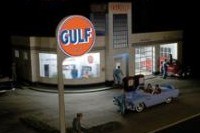
In the N scale version, the tower is not illuminated.

The modified tower roof part is clamped to the tower walls prior to soldering.

The tower is soldered into a hole cut in the building roof.

All of the main building parts are soldered together.

Then the windows and doors are soldered in place on the building.

The building is primed, painted flat white, and sealed with clear fixative.

Custom lighting panels are cut from an electroluminescent sheet.

The lighting panels are installed and tested.

The details for the main office are attached right to the "concrete" base.
![]()
![]()
Copyright © 2007-2013 by
David K. Smith. All Rights Reserved.
Miller Engineering product photo used with permission.