Naughtright Fire Company, Part 2 of 2: Finishing
As I do with all of my kitbashed brass structures, I gave it a vinegar bath, then applied ruddy primer. This primed the surface and—in this case, as it's mostly brick—also created the finish color for the bulk of the building. After masking off the rollup door area, I sprayed it with plain grey primer, followed by off-white Krylon Suede.
Since my desire was to model a painted brick building (as opposed to one with natural brick and mortar line effects), this immediately brought the finishing work to the 90% complete mark; the rest of the job was detail painting.
The window and door insets were sprayed red (inspired by what's done in real life on occasion), then bonded inside the structure, followed by glazing and venetian blinds made from paper with a printed pattern. The roof was brush-painted Floquil Weathered Black, with touches of straight black to simulate patching tar. The siren was sprayed red, and the antenna received a shot of aluminum. A chimney added to the extension roof wrapped up the topside detailing.
A note about "hidden" features: when the firehouse is finally installed on the layout, adjacent structures will block a number of the windows and doors. However, you'll note that I finished them with paint and glazing anyway. Why? With my luck, if I hadn't finished them, they'd be exposed because the town got rearranged again. It really isn't much extra work to finish up hidden items, and it's insurance against potential changes down the road.
After brush-painting the corbels, sills and side window frames with Floquil Antique White, I applied some light weathering. Firehouses are usually kept up very well, so it wouldn't do to make it look run down. But not all post-painting effects are done to age a structure. There are two other goals: enhancing details and muting colors. Natural light tends to bring out more detail than room light, so sunlight can be simulated in a way by increasing the contrast around tiny surface details. Also, remember that, when viewing Z scale models, we're effectively seeing them from a greater distance than in reality—220 times further, to be precise, so two feet becomes 440 feet. Therefore, realism can be heightened by lightening blacks and toning down brilliant colors.
I find that a light India ink wash makes details pop while keeping brightness in check. It also has the effect of magically correcting some painting flaws. My hand is no longer as steady as it used to be, so my detail painting isn't as precise as I'd prefer; the ink wash blends colors together a little and helps hide wandering edges. Then, to lighten darker colors as well as compensate for the darkening effect of the ink wash, I apply a light dusting of pale grey and tan powdered chalks.
The final touch for the exterior was the sign. First, I scanned the brass part so I had an exact-scale reference. Then I rendered artwork such that it looked like lettering cut into stone. After printing the art on white DIY decal paper, I sealed it with fixative. Using the sign part as a patter, I cut out the decal and applied it to the building. It's not perfect—the color isn't an exact match, and macro photographs reveal the printer artifacts and cutting/fitting flaws—but it's effective at normal viewing distances.
Eventually the firehouse will have an interior, but given the angle of view that's possible (it's directly across the street from O'Malley's Triangle Bar), this will be just a token bit of detailing. And since it will be a separate assembly from the main structure, I'll deal with it as the time approaches to install the firehouse on the layout.
As an aside, this project was begun in April of 2009, so it's taken just a tad over a year to complete. As projects go on the James River Branch, that's actually not too bad...
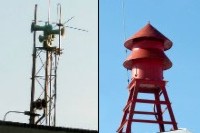
These reference images provide ideas for details to add to the firehouse.

The siren starts with these two Green Max N scale dust collectors.

The dust collector caps are attached to part of an etched brass windmill kit.

An antenna cluster is assembled atop more of the windmill kit.

The initial painting is done, and most of the detail parts are ready to install.

Painting tiny parts is easier when they are temporarily attached to "handles."

Roof details are attached, and the building receives an India ink wash.
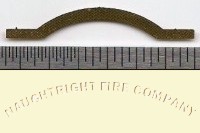
Top: the sign part is scanned. Bottom: artwork is rendered to match the shape.

The finished building, minus the interior, is positioned on the layout.
![]()
![]()
![]()
![]()
Copyright © 2007-2013 by
David K. Smith. All Rights Reserved.
Miller Engineering product photos used with permission.