Website News Archive: April 2009
30 April 2009
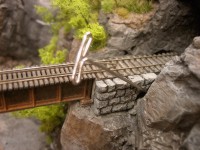 As I was a
little under the weather tonight, I didn't get as much done as I'd expected. In search of something quick and
simple, I found a perfect candidate: one of many little round-tuits that we all tend to accumulate. This one was
a bit of stone retaining wall on the back side of the track at the upper rear tunnel portal. Finally getting
that half-inch of wall installed allowed me to ballast the last inch of unballasted track on the upper line.
Also, since the layout is flipped around—and probably will remain that way for a while—I took a layout overview shot.
29 April 2009
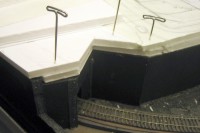 Riding
the wave of fresh inspiration precipitating from the recent changes to Naughtright and vicinity, I started
work on the area around the lower rear portal. Revisions to the access panel
and supporting structures have been completed in short order, and the portal itself is under construction.
I'm making it from PreSize and Chooch N scale stone products (oh, the horrors—just don't tell anyone).
28 April 2009
If I ever truly understood what makes me do some of the things I do on the layout, it might scare me. (Not to worry: no Version III layout, not even a radical change to Version II.) Regular visitors know I've had a longstanding struggle with the lower line where it ducks under the edge of town. It's resulted in the removal, addition, removal, addition and removal of the Front Street bridge, amongst other things. It's also vexed me from the standpoint of making a plausible-looking tunnel portal, owing to its uncomfortable proximity to the very tall retaining walls along Front Street.
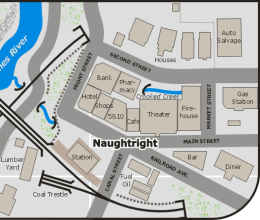 Anyway,
as I was working to ease the slope on which Naughtright sat, I noticed a curious thing: Front Street was much closer to the
lower line than it needed to be. Somehow I was thinking all along that I'd kept the clearances with the hidden helix
much tighter than I actually had, and there was nearly an inch to spare. Now, an inch may not sound like much, but in
Z scale, that's a pretty nice chunk of real estate. Shifting the town to the right as far as possible would ease the
pressure on the lower line and, in particular, the tunnel portal.
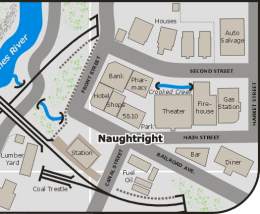 Of
course, relieving pressure on one area in a fixed space creates more pressure elsewhere. Where was I going to find nearly an
inch in a town that was already planned down to the last scale foot? I started by giving the gas
station a spin: I rotated it 90 degrees so that it faced the side of the layout. Then I moved Market Street
to the other side of the gas station. The rest of the town just slid to the right, intact, just enough to buy me the
space I wanted to add back to the lower line.
This significant change may now give rise to any number of others, so my advice is to stay tuned for further developments. If nothing else, these last two nights of revisions to Naughtright should allow me to really open up the throttle on a lot of dusty structure projects. I'm also looking long and hard at Front Street around the tunnel portal, and I'm thinking about building a kind of half-bridge—something I've seen done in situations where a road diagonally cuts across part of an opening, and a triangular span is built to fit the space. Who knows what strangeness will emerge from my fevered brain during this unexpected springtime heat wave?
27 April 2009
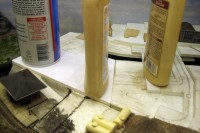 This evening
I got out my giant pretend earthmovers and leveled the town—in a manner of speaking. With my focus set on Naughtright's
buildings lately, I've been studying the transitions between elevations, and while I like having the town on a slope,
I thought the slope could be just a bit more gentle. I didn't make everything dead-flat; I just leveled out
the middle of town.
It was a selfish move: I wasn't looking forward to fabricating the special foundations and sidewalks required when practically every building is at a different elevation. It was easier to level things out than I'd expected, taking only four strategically-cut Gatorboard patches. If I were to start the layout over, I'd scratchbuild most of the structures so that they could follow slopes better. Towns on slopes are so seldom modeled, yet they're so interesting; I hope to build a town someday with streets like those of San Francisco.
Next I'm tackling the corner where Franklin's and Emma's currently sit side-by-side. The problem is the shape of the five and dime: the trapezoid is too acute to look natural, and there's no way I can revert back to the way it was when it wrapped around the corner, much as I still prefer that look. My thought is to do away with Emma's building (and move Emma's into the first floor of the Hotel), and turn the pie wedge at the corner into a tiny park, with a tree and benches. We'll see... my mind's still a muddle at the moment (it was 92 again today).
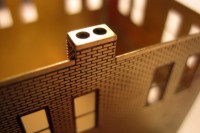 We were
suffering from an unexpected early heat wave (a few days ago I was scraping frost off my car; now it's in the 90s)
and it was a good excuse to go hide in the cool of my basement workshop. But I needed to switch gears; seeing the
pile of half-built city structures scattered around the farm got me in the mood to go back to building buildings,
and I made a random pick: the firehouse.
It turned out to be a bad pick in a way, because the project took me down a long, winding rabbit hole of futile kitbashing. I did eventually find a potential workable new direction for the thing along the way, but it's been a frustrating battle that isn't over yet. In the process, though, I came across an amusing little head-scratcher (above right): what's wrong with this picture?
To make matters "worse," the exercise gave rise to considerable consternation about some of the other languishing building projects. Next to the firehouse is the East Theater, which then came under my scrutiny, and I noticed that the patchwork walls didn't look so great, and the decals on the animated sign were starting to peel off. My experience with the crossing flasher placed an "unfortunate" notion in my head to build my own sign, with two goals: a more believably-sized sign with more realistically-behaved lights. I know, I'm a glutton for punishment.
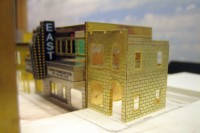 Next
to the theater is Emma's, and I really wasn't liking the
windows on the front, especially that doubled arch-topped affair on the top left. I think the building may get
replaced with something altogether different; possibly something more house-ish, like one of those little old houses
that stays put and gets squashed between tall downtown buildings...
Sheesh, this kitbashing stuff is turning out to be more work than scratchbuilding...
23 April 2009
 This evening I've been tying up some loose ends with the website; I added
a new page for the new Canal Street crossing relay box and fixed all of
the links pointing to the old one. As I was tidying up the HTML on the
construction index, I was reminded that I've occasionally flirted with
the idea of changing the layout's line from Reading to Jersey Central. I have a bunch of old Pensy F7s I've
been planning on converting into CNJ F3s; plus I have a C&O GP7 that's waiting to become CNJ as well.
Not to mention that an extra Reading caboose is slated to bear the CNJ herald someday. All of this was
nearly enough to tip me over the line, but then AZL announced their forthcoming Z scale GP30, and
I can so easily see it wearing the green and yellow Reading scheme (and it would replace my
Reading GP7 as the main motive power for the layout). Plus the fact
that, if I did switch to the CNJ, I'd have to rework every one of the 100+ pages of this website...
22 April 2009
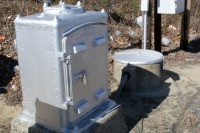 |
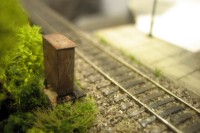
Modeling this evening consisted of revisions, as I began shuffling around some details. The Canal Street crossing relay box has a new home and a new purpose: it got moved up the tracks, across from the station, to support the soon-to-be-installed signal; the crossing flasher will receive a new—actually, a rather old—cast iron relay box, plus a sorely-needed battery box. This was inspired by a crossing in Lakewood, NJ (not far from the crossing that inspired the cantilever signal) which has the boxes seen at right.
Meanwhile, the illustration of the plan has been revised to reflect the changes I was pondering back around 18 April, along with a few new changes: with the laundromat gone, I may bring back Crooked Creek. It gives me an excuse to do something I'd wanted to do but hadn't found the right opportunity up to now: in the town were I grew up, a fairly substantial old building was built over a creek like a bridge—it stands on a trestle of sorts, with the earth open underneath. It looks like I may be able to create that kind of effect with the extension added to the back of the firehouse. We'll see; it's all kind of nebulous at the moment...
21 April 2009
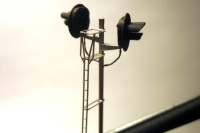 The
signal is inching closer to the finish line. This evening I spent nearly
all of my quality modeling time threading fine wires down the stanchion. It was one chore I would not care
to repeat for quite some time to come—I'm very thankful that I have such a small layout and don't have a
lot of signals to build. In fact, this is the only one! That is, unless I talk myself into making another
one for the lower line...
20 April 2009
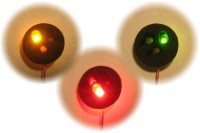 Not much
accomplished tonight on the signal except a quick test of the LEDs, and that
was enough to put a smile on my face! (The LEDs are mad bright, though, and will most definitely require
dropping resistors.) In other news, John Cubbin apparently likes the
video I tossed together of my
crossing flasher: he's featuring it on the
Ztrains home page. I suppose the video does bear the qualities
of brevity and simplicity.
19 April 2009
Thanks to my experience building the crossing flasher, I am well along with a project to make a Type "G" signal.
18 April 2009
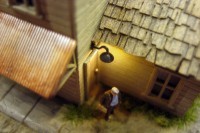 The
light over a door in a dark corner is finished. While it looks great, it
(literally) highlighted a problem with the door below it: no doorknob! The laser-cut circle is perhaps good
enough from a distance, but under close inspection, and with the glare of a spotlight right overhead, it doesn't
cut it. So I gave the door a "real" doorknob: a tiny ball of solder, which I retrieved from my
soldering iron sponge. Random modeling tip of the day!
In other news, I'm contemplating a minor change to the plan—yes, again. As I was preparing to start work on some of the scenery near the back of the layout along the lower line, I was trying to visualize the Front Street bridge, and it just wasn't coming together for me; I wasn't able to work out how the lower line was going to "disappear into the trees" past the bridge as I'd intended. I think I'll be making a tunnel there after all, and the bridge will go away yet again. Meanwhile, having another look at things from the back of the layout got me thinking about changing the laundromat to something else—something taller—since a small, low building would be all but invisible behind the hulking East Theater. Or I may remove it altogether; perhaps just an empty lot will suffice, a little "negative space" in the midst of a dense urban landscape.
14 April 2009
After the success of the crossing flasher, I decided to make use of a recent acquisition: white 0402 SMD LEDs. These things are 33% smaller than the ones I'd used in the crossing flashers (0603s). And I knew just what I was going to do with one of them, too: add a light over a door in a dark corner on the lumber yard main building.
12 April 2009
 Hallelujah!
The crossing flasher is finally finished and functional! The complicated
construction process has spilled onto a second page. I've also posted a
video of the flashers in action. Seeing it working made
up for the ten days of grief I've
endured getting it done. I'm also glad that I made both pairs of lights work, because when the room lights are off,
the flashers definitely illuminate nearby objects, including the street.
(The lighting effects in this photo were not added digitally—that's exactly the way the lights looked through
the lens of my DSLR, and they're both lit because it was a long exposure.)
7 April 2009
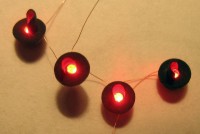 Progress on the
crossing flasher has slowed to a crawl the last several days owing to a series
of failures assembling the flasher targets. Having solved all of the problems, I was expecting to complete
the project tonight, but then my neck went bad again (a chronic condition), and the pain makes it hard to
concentrate. If it isn't one thing, it's another! But here's a little taste of what's to come...
4 April 2009
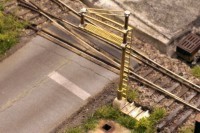 Dissatisfied
with the progress images of the crossing flasher taken so far, I broke out
the SLR so I could get a clearer shot (right). In the process, I discovered an interesting view of the
coal trestle, which I've added to the Gallery.
What made the new image different is that it didn't require a Helicon Focus treatment: the angle was such that
everything was clear in one exposure.
Now I'm struggling with the decision of whether or not the flashers facing the back of the layout should be functional. Making "dummies" would certainly reduce the amount of work to be done, not to mention eliminate the need for the expansion board to drive the extra LEDs; but it also leaves me wondering if I'd regret taking such a shortcut. Granted, making all of the lights functional satisfies the purist in me, but I do have a more practical concern: since I'm investing considerable resources to illuminate the town for night scenes, I wonder if the flashers facing away would cast light on the surroundings—particularly the flasher on the station side of the tracks. While it may sound absurdly subtle, such effects add a surprising level of realism to a scene, and I may need to conduct some experiments before I make an irreversible decision.
I'm also struggling with the decision of whether or not to keep the crossing shanty. Even after having moved it as close to the edge of the layout as practical, it's still uncomfortably close to the crossing flasher. It also partially obscures the flasher, and I'm not sure I like that since it's turning out so well. At least, if I don't want the crossing shanty there, I can just pop it out of the footing and disguise the hole with almost anything. And I can always replace it if I want it back.
3 April 2009
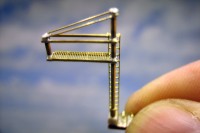 Except
for not having phosphor-bronze wire of the proper size (I used brass instead), everything pretty much went
according to plan: the crossing flasher connector has been installed in the layout, and the flasher itself
is under construction and well along. The project page has been substantially
revised and expanded, with lots of new information and photos.
2 April 2009
So, here's my plan to make the crossing flasher removable: thankfully I have this habit of saving everything I can from dead VCRs and other "junk," and I've accumulated a burgeoning collection of transformers, motors, gears, wires, and so on. Amongst this vast assortment I happened to find some multi-conductor wires with tiny connectors. I'll embed a connector in the layout; then, I'll fabricate a matching plug from a bit of PC board with four phosphor-bronze wire pins soldered to it. The flasher assembly will be attached to the other side of the PC board, which will be disguised with some weeds and such, so it should be fairly invisible when it's in position on the layout. That's my plan, anyway; we'll see if it works.
1 April 2009
A gentleman by the name of Tim Anderson, proprietor of Ngineering, was kind enough to help solve a dilemma I faced with the languishing Canal Street crossing flasher project. I wanted the flashers to behave like tungsten lamps instead of LEDs, and this problem was solved by a unique flasher circuit from Ngineering. However, the product only supports two pairs of LEDs, and I'd have at least four and possibly six pairs. Fortunately, a forthcoming product will solve this problem as well, which has allowed me to proceed with the flasher project—now my dilemma is what to use for the targets... it's always something...
Copyright © 2007-2013 by David K. Smith. All Rights Reserved.
