Landsend Farm, Part 2 of 8: The Barn
So there I was staring at my collection of barn kits. I'd made my choice: GCLaser barn kit #54283. But as I toiled away on the access panel preparing the landscaping around the structures, it nagged at me... I had that unfinished barn kit as well. How about going full-bore: build the unfinished barn kit and then finish it using the finished barn kit walls? I could leave most of the doors open on the end facing the edge of the layout, and install some lights inside to show off the fully-finished interior. If nothing else, it would make for a good, meaty project I could really sink my teeth into—in particular, it would make a change from etched brass.
Before the project even got fully under way, however, I hit the first major snag: the two kits were subtly different in size and shape. They were very close, but not exact—the slopes of the roofs were different, among other frustrating little differences. Why did GCLaser do this? It doesn't make any sense; it would seem that one kit would naturally have grown out of the geometry of the other. But not being a kit manufacturer, I could only make guesses; things were the way they were, and I simply had to deal with them as best I could.
As frustrating as this issue was, it paled by comparison to the consequences of making modifications to the basic structure. I had planned for the wall with the low door to be set back under an overhang—a design that's quite frequently seen on cattle barns. I also wanted to plug the large door on the opposite long wall.
Once I had the walls and main framing parts modified, I began to assemble it using thick CA. This kit has a lot of parts, and at first it was slightly daunting seeing them all in piles. But, once the ball got rolling, things went together surprisingly quickly; it also helped that the kit parts were cut perfectly, and they went together smoothly.
But my penchant for modification soon slowed the pace as I started cutting and pasting the walls. The fact that the boards were burned all the way through made it more than a typical challenge to cut them, and I started to make mistakes that led to several broken parts.
It was at that point I really wanted to start over with two new kits, so that I'd know in advance exactly what to do. But that would have been another hundred bucks just for the sake of neatness. So, I decided I'd try to disguise the flaws with some 80-100 years of aging. Some broken boards, a few nailed-on patches, and a coat of faded, flaking paint should distract from the ugly compromises I had to make.
Then, after sleeping on things for a night, the project took a 90-degree turn. After another hour or so of studying photographs, I realized that one solution to my patchwork wall problem was staring me in the face. On the layout, the barn would sit on a slope, with one corner cut into the ground. In a case like this, a real barn would have a stone foundation along the higher walls.
In a rather bold move, I clipped off all of the beams between the ground floor and the main floor on the two up-slope sides, then began piecing together a stone foundation from a cast resin Z scale stone wall set from Paradise City Depot. The texture was just a bit too rough for this application, so I toned it down a little by gently sanding the surface.
The foundation did away with several windows, but it also opened up some new and useful possibilities for rearranging wall parts. To make up for some of the lost windows, I cut notches in the foundation for new ones. The foundation also allowed me to detail the lower level and continue assembling the rest of the building by providing access from two sides.
Most small family barns are studies in austerity; they often lack niceties such as trim—although in the case of the kit, the trim hides the corner tabs. But the kit's trim parts were cut from cardstock, which would not match the natural wood finish, so using them was out of the question anyway. To finish the corners, I clipped off the tab/slot boards, and replaced them with new boards cut from the fret (an excellent reason to never throw anything away).
The foundation was painted with Floquil Antique White, and some random stones were hit with Concrete and Primer Gray for variation before everything received an India ink wash. The windows were installed as-is, with no finishing work. To make the window panes appear dirty, I rubbed the glazing material with 23 micron sanding film. The finished foundation was permanently glued into the scenery base on the access panel.
The first interior detail item I tackled was the lighting in the lower level. For a soft, warm glow, I soldered four amber SMD LEDs to a pair of .010-inch brass wires by first bonding the LEDs to a stainless steel ruler with CA. This held the LEDs securely enough to be soldered, but allowed them to be easily removed with a knife tip. Fine solenoid wire was soldered to the brass wires, and the assembly was CAed to the joists. The wires were then painted with flat brown paint to kill the shine and blend in with the wood, and fed through the base to set of resistors assembled on a small piece of PC board.
I was planning on illuminating the upper part of the barn as well, but as I was assembling the walls, I noticed that the thin wood was translucent, and I didn't want to ruin its subtle surface texture by trying to make it opaque with dense paints. As it is, I've had to be careful about the positioning and brightness of the lights in the lower area.
Interior detailing in the lower level consisted simply of a number of fence sections from a Micro-Trains livestock pen kit. Given the very limited opportunity to see inside this part of the barn, the fencing provides just enough visual complexity to suggest a fully-detailed interior, and creates a nice light-and-shadow play when illuminated.
Prior to attaching the roof and doors, the walls were finished. This involved a slightly unusual process... first, I tinted the entire structure with a dark red Sharpie. Then I applied a liberal amount of dark red powdered chalk, followed by some tan chalk along the lower edges for weathering. This combination exactly reproduced the faded, dry-as-dust barn red finish I was after, and preserved the fine wood surface textures.
The original kit doors were solid wood with paper frame overlays, which would have posed a problem getting the finish to match the rest of the barn, so I scrounged new doors left over from Mountaineer Precision Products barn kits (since discontinued) that had been bashed for other projects. Also, the main door was changed from being hinged to a rolling type. The rail was made from a length of brass 1/32-inch angle stock, and bits of paper (saturated with CA for strength) were cut out to create the rollers, all of which was painted with a rust patina.
The hayloft doors were affixed in the open position so that bits of the interior framing could be glimpsed; otherwise, it would have been something of a wasted effort to build the barn the way I did, right? (Actually, in the interest of full disclosure, in addition to allowing a peek inside, I left the doors open to disguise the fact that they were not exactly the right size. That will have to remain our little secret...)
Originally I had intended to detail the interior with appropriate stuff, but subsequently decided this would have been too much work given the lack of visibility. However, because the siding boards are gapped, one can get a sense of the emptiness of the barn by virtue of the light passing through it. So, I created an insert made from folded grey paper, cut with irregular shapes, that "filled" the space with nondescript objects. The folded paper was inserted through the door and teased into a "W" shape to fill the space as best as possible. Under normal lighting conditions, it does the intended job of counteracting the otherwise empty look of the barn.
After plugging all of the assembly slots in the original kit roof parts and bonding them to the rafters, I filled in the notch along the peak with a scrap of stripwood. Then I finished the roof with simulated standing-seam sheet metal. This was made by burnishing heavy-duty aluminum foil against a sheet of Evergreen styrene board and batten siding. I attached the foil to the plywood roof with double-sided tape, then weathered it with a few liberal applications of Rustall plus some dry-brushed streaks of Doctor Ben's Weathered Rust.
The finishing touch was a pair of lightning rods, one at each end of the peak. These were made from .010 steel wire.
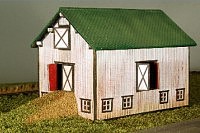
This is the GCLaser finished barn kit that is the basis of the project.
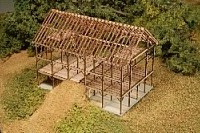
GCLaser's unfinished barn kit will become the interior of the barn.
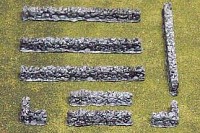
These stone walls will be adapted for the barn's foundation.

The main wall parts are going through their first round of "cut and paste."

Except for the rafters, the framework is complete.

The foundation is made by grafting several stone wall parts together.

The foundation and modified framework are test-fit on the layout.

This area reveals the recess created under the side of the barn.

The barn sides are attached to the frame, and the distressing is evaluated.

Notches are cut in the foundation for the windows.

Windows are installed in the foundation, and the barn is test-fit again.

This side of the barn faces the edge of the layout so it can be seen clearly.

SMD LEDs are assembled into a strip installed under the main floor.

The LEDs are wired into resistors on a PC board on the underside of the base.

While difficult to photograph, this image provides an idea of the lighting effect.

Interior detailing on the lower level consists simply of some fencing.

Finish work on the walls is completed before attaching roof or doors.

A paper baffle inserted into the barn counteracts the look of being empty.

A new rolling-type main door is made from kit scraps and brass angle stock.

Heavy-duty aluminum foil is embossed to look like a standing seam roof.

The completed barn is ready for a herd of dairy cows to move in.
![]()
![]()
![]()
![]()
Copyright © 2007-2013 by David K. Smith. All Rights Reserved.
GCLaser product photos used with permission.