Front Street Bank, Part 4 of 4:
Water Tank with Aircraft Warning Beacon
I place partial blame for this detail item on Ngineering, source of a fantastic line of lighting effects circuits that accurately simulate the behavior of incandescent lamps, which happen to meet my "purist" tendency for such accuracy. I've been looking for an excuse to use their aircraft warning beacon; I'd actually contemplated installing a radio transmitting tower on the hill across the river just so I could add the light, but I didn't like the idea of something quite that tall sticking up—on such a small layout, it would look oddly-proportioned, not to mention that it would become a target for accidental damage.
As I was wrapping up construction of the Front Street Bank, I was in the midst of assembling a Micron Art water tank kit (which I'd purchased specifically for this application) when I was struck by the notion of adding an aircraft warning beacon. Now, granted, the tank is hardly tall enough to warrant it (indeed, the building itself probably wouldn't have such a tank in the first place), but it is the tallest point in town, after all, and it satisfied my desire to add such a light.
That I thought of this halfway through construction of the water tank, which I'd modified fairly extensively, starting with the tank itself. It seemed a bit tall, at least for the stubby building to which it was being added, so I sliced off the top at the first band. (Yes, this did away with the nice etched sign, but such is life.)
I also thought that the tank was a bit too "see-through"—which certainly would have created problems holding water!—and I found that 7/16-inch styrene tubing was a perfect fit. After shaping the tank part and bonding it to the base, I cut a length of tube to match, painted it black, and pressed it into the tank. (Painting the tube black lessened the need to lay on the final paint heavily enough to get into all the joints and hide the white styrene.)
The base was beefed up with a piece of .040-inch sheet styrene so that, when the support frame was attached, it would not be partially hidden by the folded-down sides of the tank base. The support frame was soldered together for strength; I also filled in the rest of the corners with solder to hide the slotted bend points.
After bending and soldering the roof, I soldered its peak directly to the end of .060-diameter brass tubing, and sanded the solder joint to shape. I bonded the roof support to the roof, and then bonded the tank in place. The final touch was the addition of a ladder (Micron Art Z Scratch ladder kit #91401), necessary in order to service the light. The light itself is a red 0603 SMD LED mounted facing skyward and connected to the flasher circuit (Ngineering #N8032) with fine solenoid wire.
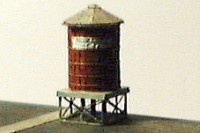
Here's the original Micron Art water tank kit.

The shortened tank is filled in with styrene tubing.

The base is filled in with sheet styrene to expose the whole support frame.

The assembled roof is soldered directly to brass tubing.

The completed tank receives a ladder as an extra detail.

The finished tank is mounted on the roof before being illuminated.

The LED is installed on the tank and wired to the flasher inside the building.
|
|
![]()
![]()
![]()
![]()
Copyright © 2007-2013 by
David K. Smith. All Rights Reserved.
Micron Art product photo used with permission.