
The Crankshaft, Take 7 Were it not for a weakened solder joint in number six, I might have stopped there. But I felt pretty certain that the joint was damaged in the final step of cleaning out the cranks after cutting the main crankshaft, and I had an idea how to address the problem: leave the "handles" on the cranks until absolutely everything else was done. The dilemma is that the handles are (comparatively speaking) quite massive, especially as they're sandwiched to a spacer shim; this extra mass would place strain on the delicate crankshaft joints. I could reduce their mass by being more precise in making the web blanks, so they—and the spacer shims—could be smaller. Thus my first order of business was to lightly scribe evenly-spaced lines on the sheet metal (below left) to make the holes consistently positioned and closer together. I also made a set of relatively neat spacer shims (below right).
To my surprise, the value of working more precisely at every stage of fabrication has extended well beyond merely providing an alternative approach to the final assembly, as I'd intended. I soon learned that my habit of being "casual" about making making parts no one would ever see wasn't saving me time, and that being "neat and tidy" wasn't about being anal; it's meant using less raw material, removing less excess material, producing fewer reject parts, and ultimately spending less time making parts.
The web blanks were carefully sliced away from the stock sheet (above right), yielding a set of consistent parts that were a relatively breeze to grind down to shape (above right) in preparation for assembling into pairs on the spacer shims (below left). Then, after soldering the crank assemblies to the crankshaft, I didn't cut off the handles (below right).
Leaving them intact certainly made the process of slicing out the crankshaft from between the webs considerably easier, as I now had very large objects to reliably grip for the trickiest step of all (below left). Indeed, the parts were so secure that I didn't bother with the drill press kluge from before; instead, I set up a rail parallel to the Dremel with the cutoff disc against which I rested the hemostat. Ironically, even though I was holding the hemostat in my hand, I was less nervous about the process, and it proceeded without a hitch.
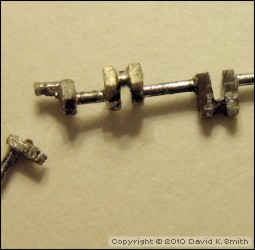
Likewise it was also much easier to clean out the cranks. What I hadn't counted on, however, was being so careless with my nearly-finished crankshaft. I was mounting the hemostat in a vice so that it was steady while I cleaned out the cranks with a jeweler's saw blade. That's when I destroyed it. All I did was lightly flick the end of the long wire protruding out the end with the tip of my finger—so lightly, in fact, that I didn't even realize I'd done it until I noticed the sickening sight of the shaft bent at an angle of around 60 degrees. What I did next, however, was perhaps a bit strange: I attempted to repair the broken solder joint. I knew that it would be impossible to repair without cosmetically ruining the crank, but I did it anyway so I that could go through the motions of finishing the remaining steps on the two good cranks; otherwise, I'd lose valuable learning experiences. So I sliced the handles off of the cranks and cleaned up the ends. Were it not for the one broken crank joint, it might have been time for champagne. Instead, it was time to start over. But it was a worthwhile exercise; look at the last image, above right: see how clean and precise the two right cranks are. That's what I'm after, and now I know I can get there. Some lessons learned: In the future, I don't think I'll leave the long excess shafts on the ends of the assembly—they seem to be lightning rods for clumsy fingers. I'm also toying with the idea of placing aluminum foil strips around the crankpins to help keep them from getting bonded to the main crankshaft when I'm soldering the latter in place; this should hopefully simplify the crank cleanup process. I'm also going to reduce the size of the web blanks even more—the crank/spacer assemblies were still massive enough that they placed a fair bit of strain on the solder joints once the crankshaft was sliced up. It may not seem like it, but it's all good.
|


Copyright © 2010 by David K. Smith. All Rights Reserved.