Landsend Farm, Part 6 of 8: Corncribs
Micron Art's Corncrib kit (#MA-1006) was chosen as an alternative to making a full-sized silo, which I found difficult to incorporate into the property the way it was laid out. The kit is curious: there are enough parts to make two complete cribs, except... there's only one ladder? (Fortunately I had loads of extra etched brass ladders on hand to make up for it.) But then, the kit includes three roof caps—which was a good thing as I lost one during assembly.
My preference is always to solder brass kits, and as counterintuitive as it may seem, it's a very good approach for delicate structures such as this, since many times CA is not strong enough to hold tiny joints together—and in this case, there were two parts that were assembled by bonding the brass parts edge-wise.
After removing the parts from the frets, I cleaned up their edges with fine sanding film. The first assembly step was to curl the crib itself, which I did by rolling it against a knife handle with my thumbs. The joint was soldered by liberally applying Stay-Clean flux and briefly touching the tinned iron tip to the joint. I figured that filling in some of the openings was inevitable, but I wasn't concerned, as I was going to finish the cribs as being disused—rusted and covered with vines—which would disguise assembly flaws.
The next assembly step was to painstakingly insert the pins on the bottom of the crib into the holes in the base. Afterward, I soldered all of the pins to the base. Finally, I sanded the bottom of the base smooth with sanding film. This helped to correct imperfections in the round shape of the crib.
The roof was shaped using a needle-nose pliers, one section at a time. After soldering the edges together, the roof was attached to the crib by tinning the inside edges, tinning the top edge of the crib, holding them together, and then heating the edge of the roof to bond the parts. The tiny cap part was attached in a similar manner.
The last assembly step was the ladder, which comes from the Micron Art Z-Scratch kit #91402. After clipping a ladder to length, I soldered it to the edge of the roof and the edge of the base.
For the finish work, I used reference photos of disused cribs, obtained by an Internet search, to get the look right. Painting them, however, was a substantial challenge: how does one paint the interior of an enclosed yet see-through structure? After trying a few different things that failed, I took the direct approach: I dipped them in a jar of Doctor Ben's Weathered Rust. This of course plugged every hole, but they opened right back up when dabbed lightly with a paper towel. I wasn't worried if the odd hole remained plugged here and there, since I was going to apply vines as a finishing touch.
After the interior patina dried, I sprayed the outside with an extremely light alternate mistings of flat black and ruddy primer, which was followed by some Rustall for good measure. Then I attached ground foam vines with thin trails of dark wood carpenter's glue. When everything was dry, I gave the finished corncribs a healthy application of Dull Cote to protect the delicate finish as well as the vines.
The cribs were glued to the terrain with carpenter's glue, and blended into their surroundings with grasses, weeds and a few spindly young trees.
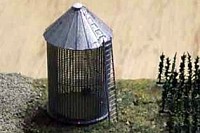
Micron Art's Corncribs will be aged to simulate disused structures.

The parts are cut from the frets using a special cutting tool to avoid damage.

A crib is shaped by rolling it against a knife handle with my thumbs.

The joints are soldered by lightly touching the iron tip to the fluxed parts.

The roof is shaped by bending it while holding it with needle-nose pliers.

Prior to painting, the assembled cribs are placed in position on the layout.

The cribs dry out after being dipped in a rust patina solution.

Layers of paint, weathering patinas, and some vines complete the cribs.
![]()
![]()
![]()
![]()
Copyright © 2007-2013 by David K. Smith. All Rights Reserved.
Micron Art product photo used with permission.