
Toward Greater Freight Car Realism
by David K. Smith, 17 July 2009
Regulars may (or may not) have wondered: why are there hardly ever any freight cars in my photos of the layout? There was usually only the GP7 or the caboose (well, there were those 3RWorks shorty tankcars in some shots). The reason is that I've been struggling to develop some sort of standardized process of upgrading the trucks, wheels and couplers of my rolling stock for improved appearance. The problem has been the relatively limited alternatives. Well, with Full Throttle's new trucks now at last making their début on their latest hoppers, the time has finally come to begin that process.
 As an aside, I was both
delighted and disappointed by Full Throttle's release. As I'd previously reported, their
fully-automatic coupler design was exciting and clever, but it wasn't ready for prime time. However, their "new"
officially-released sets do not appear to be any different from the pre-production samples I'd received; my guess is that
the samples were actually part of a fairly large initial run, and to deal with the faulty couplers, they simply clipped
off the trip pins (since the pins hold the knuckles together, they can't be removed). This means the couplers will couple
automatically, but won't uncouple hands-free. Regrettably, it makes for an inauspicious product launch that wound up
unexpectedly competing with the AZL Auto-Latch, instead of the Micro-Trains Magne-Matic as intended.
I really feel sorry for "Uncle Will," as he's been beset by more than anyone's fair share of bad luck. He'd intended to make his metal wheelsets Micro-Trains-compatible, so that he could also sell them as replacements. But somehow the axle length got messed up by a few thousandths of an inch, making them too big to fit Micro-Trains trucks. In the meantime, while Will sits on a heap of wheelsets that will only work in his trucks, Fox Valley Models has released their own new replacement wheelsets for Micro-Trains trucks, following the path of their tremendously successful N scale version.
Still, it is progress, if incremental—at least we get Will's fantastic trucks! Make no mistake, Full Throttle trucks roll better than anything else, hands down, and the wheels track flawlessly, gliding through turnouts like they're not there. In fact, they roll so well that I had some difficulty photographing them: they'd start to move on a grade of less than 1%, whereas Micro-Trains trucks would just sit there like they had brakes on.
So, why did I opt for the Full Throttle trucks as my standard, instead of AZL, or Micro-Trains with Fox Valley Models replacements? Well, AZL wheels won't roll on my handlaid track, and as nice as the new Fox Valley wheels may be, they're made for Micro-Trains trucks, which are almost 20% too small overall—they'd be accurate if Z scale was 1:260. This may sound trivial, but the difference is actually quite noticeable when they're placed side-by-side with properly-sized trucks. Once I'd compared Micro-Trains and Full Throttle trucks, the appearance of the former—despite their superior tooling—really started to bother me; they looked like dwarfs. Sadly, now whenever I see a photograph of a Z scale freight train, those trucks just make the image scream "Z scale," no matter how good the modeling or photography may be. So it was an easy decision to choose Full Throttle trucks as my standard; I simply had to wait until they were released. Anyway, on with the project...
The first technical issue to overcome was ride height. Micro-Trains freight cars tend to sit higher above the rails than the real thing. Or do they? After taking some careful measurements, I was surprised to learn that, if indeed the height was off, it was by an imperceptible amount (which certainly stands in stark contrast to their N scale boxcars, where Micro-Trains catches no end of flack from proto-modelers). I suspect the ride height problem for Z scale boxcars is actually due more to the proportions of their trucks: being too small in height and length, they tend to leave more "air space" between the car and the truck, creating the illusion that the car is sitting too high.
Now, here's where things get even more interesting: Full Throttle trucks are designed differently than Micro-Trains (as well as AZL) in that the tops of the sideframes are higher than the center plate—which, as it happens, is just the way real trucks are designed. This clever trick allows their sideframes to be accurately sized and proportioned without compromising ride height. By contrast, every other Z scale truck is flat across the top (this explains why AZL trucks look "squashed"—and why it will probably be a long wait before there will be any decent-looking roller bearing trucks).
So, there were no ride height corrections needed after all; replacing the stock trucks with Full Throttle trucks still leaves the boxcar sitting at just the right height, and immediately improves its appearance, too! In particular, I was pleasantly surprised to find that Full Throttle's trucks did not interfere with the boxcar stirrups (I was prepared for the need to install BLMA etched metal replacements). Furthermore, as a bonus, the shorter and shallower coupler box results in closer coupling and better overall cosmetics.
It was tempting to stop at that point and call it a day. However, I'd planned all along to body-mount my couplers, and not just for the sake of being able to say that they were body-mounted; with an eye-level layout, there are some cosmetic advantages. But I wasn't going to use Micro-Trains couplers—I would not be doing any switching, so there was no need for automatic uncoupling, and I absolutely did not want to deal with the "slinky effect" in my trains, especially with my wild grades.
Originally I was going to use AZL's Auto-Latch couplers, mounted in modified Micro-Trains coupler pockets, no less—talk about a mighty kluge! But after several evenings of grief trying to develop a workable approach, I switched to the new Full Throttle couplers. The main reason for the switch was because their coupler shank is one slim part, instead of two parts for AZL couplers, and two plus a spring for Micro-Trains. What this meant was that I could do away with one of the biggest eyesores that exists on Z scale boxcars.
We've all seen them—or perhaps not; they're so ubiquitous that we've probably become used to them, to the point that they're practically "invisible." Yet virtually every small-scale model boxcar has them, even though real boxcars don't. What are they? Notches in the ends to clear truck-mounted couplers. For my boxcars, their days were numbered!
The coupler notches in Micro-Trains boxcars are easily filled in with .020 x .040-inch strip styrene. The only tricky part is painting the fillers to match the cars, but some judicious weathering ought to disguise any minor mismatches. Curiously, the first car I did looked strange, likely because I'd become accustomed to the notches. I even quickly double-checked a couple of prototype photos just to be sure! But it wasn't long before I acclimated to the corrected body, just as I had to correctly-sized trucks.
Body-mounting the couplers, however, was not so straightforward; I tried scores of different techniques in search of one that was "clean": as simple as possible and easily repeatable in a consistent manner. At this point, most readers may as well head for the Back button, because admittedly these procedures are not for everyone; in fact, it's quite possible no one else will ever want to do what I did. But for the terminally curious, here's how I body-mounted the Full Throttle couplers.
First, I removed the wheels and dismantled the coupler pocket. Next, I cut the pocket off of the truck as neatly as possible, because I would need all of the parts. I clipped off approximately .030 inches of one end of the lid (it's symmetrical, so which end doesn't matter); using the frame as a reference, I drilled a #55 hole in the lid near the cut end, then used a larger drill to make a countersink. Finally, I clipped off the rear end of the coupler pocket so that it would clear the truck center plate.
There were only a few modifications made to the frame. Some frames have a slight ridge along the very end, under the coupler area, which I removed by simply scraping it with a sharp knife. I then tapped the coupler mounting hole for a 00-90 screw. While I was at it, I filed off most of the Z-shaped (how appropriate) Märklin coupler return spring retainer; I also cleaned up the bolster with just a light filing to remove any surface irregularities.
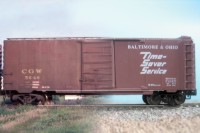
Compare the ride height of the model with a real boxcar.
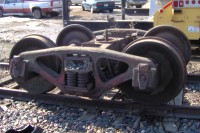
Note how the sideframes are higher than the center plate on a real truck.
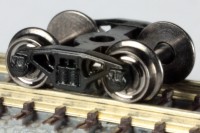
The sideframes are higher than the center plate on a Full Throttle truck.
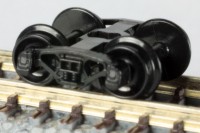
The top of the undersized Micro-Trains truck is completely flat.
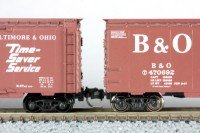
Micro-Trains on the left, Full Throttle on the right.
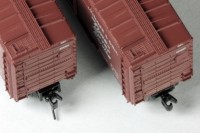
Micro-Trains on the left, Full Throttle on the right.
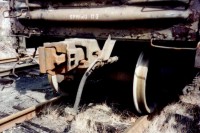
There are no notches for the couplers on real boxcars.
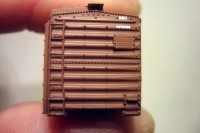
Z scale boxcars need notches to clear coupler pockets.
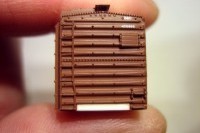
This notch is filled in with a piece of strip styrene.
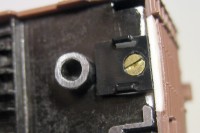
A Full Throttle coupler lid is attached to the frame with a screw.
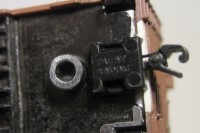
The coupler and pocket are snapped onto the lid.
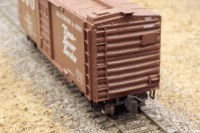
Prior to weathering the car, this is the finished effect.
After installing the frame in a boxcar shell, I test-fit the coupler pocket lid to make sure it was flush with the coupler notch filler. If some shimming was needed, I just applied transparent tape to the top of the lid. Then I attached the lid to the frame with a standard Micro-Trains coupler mounting screw (the head had to be filed slightly so that it was perfectly flush with the surface of the lid). Finally, I positioned the coupler inside the pocket, and snapped it in place on the lid. Done. It may not sound like it would, but the coupler did end up the same height above the rails at which it started. And as an added bonus, this technique pulled the coupler in just a little tighter for even closer coupling.
While I had the car apart, I made a trivial cosmetic improvement to the frame which will likely have some readers rolling their eyes. As I was photographing one of my earlier car-lowering efforts, I noticed that light could pass under the car body and over the inner wheelsets (another "problem" with an eye-level layout). This would never happen in real life because the frame would block the light. So, I glued a piece of .080-inch square strip styrene in the depressed space between the bolster and the middle portion of the frame, then painted it flat black. "Light leak" solved.
After all is said and done, I'm quite satisfied with the upgrade procedure I've developed, particularly as it resulted in bigger cosmetic gains than I'd expected at the outset. I lost magnetic uncoupling as a result, but that was never a concern for me; anyway, I now have significantly better-looking and better-rolling cars. Granted, at some point I'll have to replace those sad-looking Peacock-style brakewheels; unfortunately the solid cast-on roofwalks won't be so easy to fix...
Copyright © 2007-2013 by David K. Smith. All Rights Reserved.