O'Malley's Triangle Bar, Part 2 of 2: The Building
The first thing I did was rehearse the installation of the sign, just to be sure my idea would work. After soldering the main building joint together, I used a Dremel tool with a diamond disc to remove the web of brass between the windows, and needle files to clean up the finished opening, frequently test-fitting the sign as I went. Ultimately, it worked perfectly. And with that bit of urgency out of the way, I set about completing the building.
At first this project was looking like a nearly-stock build, with the sign installation being the only modification. But as I was folding some of the many parts, I decided that, at the very least, the boring brick cornice needed to be replaced. At first I was tempted to use some ornate cornice parts from Micron Art, but decided instead to tap the copious supply of leftovers from the Franklin Five and Dime project, as they fit better with the rest of the architecture.
Otherwise I built the kit pretty much the way it came—even using the same color scheme, as I liked the combination of green and white in the product photo. It was a fun kit that has quite a lot of character—and thus quite a few parts to bend, paint and assemble. This is not a complaint—indeed, just the opposite.
Painting this beastie was a bit different from most other projects. Ordinarily I'd bring a building assembly to the 80-90% mark, prime it, and then do detail painting. Because many different colors had to be applied to numerous separate parts, as well as multiple colors for the main building, this time I primed everything first with light grey primer. I then segregated parts according to their finish color, and sprayed them. Meanwhile, I applied masks to the main building and sprayed it with the various finishes required, which included brick (Valspar Terra Cotta), stucco (Krylon Suede), and woodwork (Rust-O-Leum Spruce Green).
Likewise, assembly was a bit different, mostly because of the way the windows fit together: I had to glaze the subassemblies before installing them on the main building. And the cornice was unusual as well: I had to assemble it such that the roof would be removable, in order to connect the wires to the sign after the building was installed on the layout, as there was inadequate access to the connectors from below.
I get lots of compliments for my modeling. But lest anyone think that I'm some master modeler who can do no wrong, let me assure readers that I make more than my share of mistakes. As an example, after having successfully applied three colors to the main building, I didn't mask it properly for the last one, and got Terra Cotta all over the stucco and woodwork on the front (viewer's) side. Had it been the back, I might have disguised it with weathering, but that wouldn't have looked convincing in this case.
To make matters worse, I spilled some solvent on the main window assembly after installing it on the building. Ultimately it reached the point where I gave the whole thing an acetone bath and started over, as I've done many times on other projects—one of the distinct advantages of working with brass as compared to wood or plastic.
After finally getting the building properly painted and assembled, I had one last chore: do something about the little roof parts over the bay windows. The original parts didn't look so good—they were flat and uninteresting, yet quite difficult to bend. So, I made replacements from board and batten sheet styrene stock: I sanded the edge to a narrow triangular shape, sliced off one long strip to the proper depth, then clipped off the five sections required. I sprayed the undersides and ends with the same dark green as the woodwork, then painted the batten surfaces with copper paint to add a touch of spice to a building rich with architectural details.
Originally I'd intended to make full interior detailing for the first floor, but given the awkward view owing to the block of trees beside the old billboard, I elected to create a different look for this business. Using artwork gathered from the Internet, I made window inserts designed to look like large neon signs. I arranged the art on a black background, and printed it on overhead transparency material; I printed it in reverse so that the clean, unprinted transparency sheet would face outward and provide window glazing a the same time. I also printed multiple copies of the art, as I needed to laminate three layers together to build up the density of the black as well as the colors. After installing the art, I added Miller Engineering electroluminescent panels behind them to provide illumination. I felt this made a good detailing compromise—it added unique visual interest without entailing an onerous amount of work that ultimately might not even be visible.
Installing the building on the layout was a bit tricky, as it not only straddled a narrow corner, but the streets on either side were sloped at different angles. The sloping sidewalk and flat foundation parts were assembled such that the sidewalk met the foundation at the entrance.
After completing the street corner, I added a bus stop—by accident!
This is the original Miller Engineering Triangle Hotel & Bar kit.

The structure's walls are clamped with a pair of clamps and tack-soldered.

The soldering is finished after the clamps are removed.

The two end windows are joined to make a single opening for the sign.

Parts for a new cornice are soldered together to make them long enough.

After parts are painted, subassemblies are bonded together.

Pieces of styrene board and batten are cut to make new bay window roof parts.

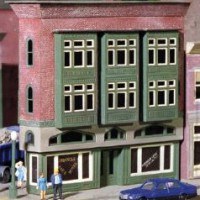
The copper finish on the bay window roofs add a colorful touch.

Artwork is created to make appropriate signs for the bar windows.

EL panels installed behind the signs create a neon effect.

The finished building requires a special foundation and sidewalk assembly.

A bus stop forms spontaneously on the street corner.
![]()
![]()
![]()
![]()
Copyright © 2007-2013 by
David K. Smith. All Rights Reserved.
Miller Engineering product photo used with permission.