Abandoned Factory, Part 3 of 4: Windows & Walls
Had the building been finished on all sides, as opposed to being truncated by the edge of the layout, I would have dealt with the interior detailing before adding windows and walls. However, in this case I have complete access to the interior through the back of the building, and I left interior detailing as the final step so that I could essentially design the interior according to what was visible through the windows. This allowed me to avoid modeling things that wouldn't be seen, and arrange visible objects for best effect. (The exception was the small third floor, but this was just a matter of leaving the back brick wall off until the interior was finished.)
After installing the windows, however, I was at once thrilled and dismayed: the windows themselves looked fantastic, but once installed it became evident that I'd somehow miscalculated the height of the floors versus that of the windows, and some of the spaces under them were awkwardly narrow. In a panic, I sifted through my collection of reference photos looking for anything that looked remotely like my model, and I was relieved to find some buildings that were quite close (an example is shown below, captured from Google Street View).
When placing the building in position on the layout to study, I became aware of yet another problem: I hadn't planned ahead to accommodate the stairs that were supposed to go on the front wall. Either I'll need to do some more fudging, or I just may have to eliminate the stairs, which would be a serious disappointment; it will be a bridge to cross as the project progresses. Such are the trials and tribulations that come with scratchbuilding!
The walls were relatively simple to make: they were simply cut from leftover etched brass kit scraps, of which I had more than enough. Using my trusty old paper cutter, I cut them to size individually so that they precisely fit each opening. Some walls also had doors, and these were simply cut from kit scraps that already had doors.
After ensuring that all of the wall pieces fit their respective openings, I attached them to a scrap of cardboard arranged in the order they would be installed, sprayed them with primer, applied mortar effect (Doctor Ben's Aged Driftwood stain), and weathered them with powdered chalks. After installing the wall parts on the superstructure, I noticed yet another faux pas: I should have painted their backs as well, since they're visible through all of those open windows. Ah, well, live and learn.
Next came the wall caps under the windows. These were simply bits of .010 x .020-inch strip styrene cut to length, sprayed with Light Aircraft Gray, and weathered with India ink. Given all of the problems I'd faced up to this point, it was nice that something went without a hitch. Lastly the three doors (kit leftovers sprayed primer grey) were installed in their respective openings. The smaller entrance door fit in an opening that was originally a window I enlarged with a jeweler's file; it will eventually receive a set of steps with a railing.
Incidentally, the freight doors will be covered up by a permanently-parked boxcar, so no one will be able to see that they're not the correct height. Actually, the doors exist in the first place only because I didn't have enough solid plain brick scraps left to fill in the two wall panels!
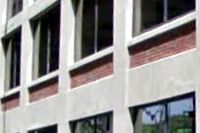
Some buildings have rather narrow brick strips under the windows.

After the windows are installed, the building is posed on the layout.

Brick wall panels are cut to fit each opening and prepared for painting.

Painted and weathered brick wall panels are installed under the windows.

Doors are installed in the openings and final weathering is applied.
With the basic exterior assembly complete, I made one last careful pass with touch-up paints, then had at it with a final round of weathering. The reference structure is seriously grungy—if it was a model, I'd say it was over-weathered! I did most of the final weathering by dry-brushing India ink wash with a rake brush, with some powdered chalks added for good measure. Then I sealed it all up with a healthy dose of Dull Cote.
The final construction phase for this project will be adding the interior and exterior detailing. Hopefully I can pull this off with fewer blunders...
![]()
![]()
![]()
![]()
Copyright © 2007-2013 by
David K. Smith. All Rights Reserved.
B.S.A. Works reference images courtesy of www.madeinbirmingham.org and used with permission.