
Abandoned Factory, Part 2 of 4: The Superstructure
In consideration of the effort involved, the completion of the many large window panels for the abandoned factory was a major milestone; next in line was the superstructure. The model would be constructed in essentially the same manner as the real building, which consists of a simple system of reinforced concrete columns and slabs.
Although the shape of the space (see the area marked "PARK" in the second image) dictated window placement, the completed windows ultimately defined the final size and shape of the building, since the window assembly technique did not afford any opportunity for fine size adjustment. And so the next step in construction was to use the windows to develop the precise floor plan. All of the other dimensions—floor height, column width, etcetera—were eyeballed from the reference images.
Two key measurements were needed in order to establish the basic dimensions for all of the buildings components: narrow window plus two columns, and wide window plus two columns. These two dimensions were obtained by arranging all of the same-sized windows in a stack and placing strip styrene columns against each end. The window stacking ensured that the longest window was in control of the dimension.
Using these key measurements, I cut two pieces of .060-inch sheet styrene for each floor, plus the roof; they'll be laminated together to produce the desired thickness. After laminating them and cleaning up all edges, I notched them to accept the vertical columns, which were cut from .080-inch square square strip styrene; the size and placement of the notches had to be precise so that the windows fit properly. After marking the notch locations with a sharp knife, I mounted the panels in a vice, made cuts with a razor saw, and cleaned up the openings with a square jeweler's file.
To the sides of each column I applied 36 .010 x .040 styrene strips to serve as mounting surfaces for the windows and brick panels; the strips also established the vertical positioning of the floors. These had to be applied to the nine columns with great care, because on all but two of the columns the strips had to be applied in different arrangements; I wound up having to correct a few mistakes.
Because most of the interior of the building would be visible through the large, unglazed windows, I sprayed all of the styrene parts with light aircraft grey before proceeding. Then I assembled the superstructure, which led to a number of minor structural revisions; the most significant of these was cutting down the small third floor, which I'd made the same height as the other two in error.
Once the superstructure was completed, the next step was to distress the concrete surfaces. The distressing process was done using a razor saw; I scraped and hacked and chopped at the styrene until I achieved the desired texture. When this was done, I applied roof texture made from strips of masking tape cut to simulate the effect seen from satellite images. Then I re-sprayed the building with Light Aircraft Gray.
After masking off the walls, I lightly sprayed the roof materials with dark grey primer. Curiously, the final coloring of the roof was not planned: the dark grey primer I applied reacted with the concrete-colored paint underneath, which produced some unexpected—but entirely satisfactory—variegations. A happy accident to be sure!
But then came a not-so-happy accident... When I applied an India ink wash to bring out the texture of the distressed concrete, I immediately saw that I'd taken the distressing process way too far. The problem is that it's difficult to judge the degree of texture on the all-white styrene surfaces.
To correct my faux pas, I sanded all of the surfaces with coarse sandpaper, which allowed me to gauge the amount of texture that remained—essentially I was now controlling the degree of distressing by a subtractive method. When I had it about right, I masked the roof, re-sprayed the superstructure, and applied a much lighter India ink wash. The second time around was infinitely better—indeed, some of the effects might not have been possible had I been more restrained the first time around.
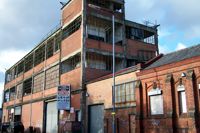
This building in Britain is used as the primary reference for my model.
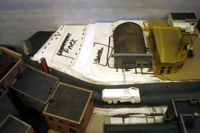
The model will occupy the space marked "PARK" on the layout.
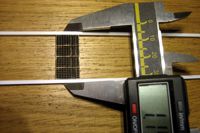
The finished windows are stacked and measured with the styrene columns.
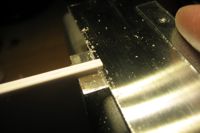
Floor/roof panels are notched for the columns with a razor saw.
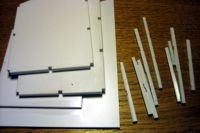
The styrene superstructure parts are done and prepped for painting.
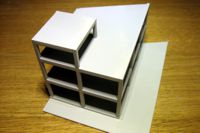
The painted parts are assembled and necessary modifications are made.
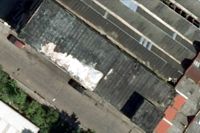
The roof is textured to simulate its appearance as seen in satellite images.
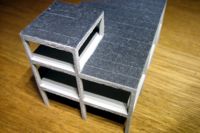
The roofing material is added to the structure prior to the final painting.
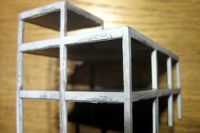
The concrete distressing was deemed unsatisfactory, and is re-done.
One might wonder why I'd completely finish the superstructure, including weathering, before adding windows and walls. As I studied the reference images, I noticed that the different materials weathered in different ways, so I treated each of these elements separately. Besides, there was no practical way to mask off the delicate windows in order to perform the weathering on the other parts. And so, with the superstructure complete, I was ready to move on with the windows, walls and interior.
Copyright © 2007-2013 by
David K. Smith. All Rights Reserved.
B.S.A. Works reference images courtesy of www.madeinbirmingham.org and used with permission.