Abandoned Factory, Part 1 of 4: Getting Started
The abandoned factory project came about as a result of observing a "hole" in the view of Naughtright created by what was originally to be a cemetery and later a park at the back of the layout. (Well, this actually represents recent history; originally there was to be a few houses in this area.) I'm not certain what inspired the decision to place a factory there, but regardless, I went into the project faced with a decision to make about its architecture: should I go with classic old brick, circa mid-late 19th Century, or something a little more contemporary?
Ultimately the choice of architectural style was decided for me when I came across the Micron Art factory windows in my detail parts drawer; I immediately felt it would make for a really eye-catching effect to have large banks of delicate windows arranged so that one can easily see inside—and even through—the building.
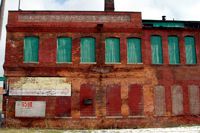
Then, the decision to model the factory as abandoned came about when I did an image search and found the Birmingham Small Arms Works located in Birmingham, Great Britain (shown at right). It's representative of many thousands of "Model Factory" style structures built around the word in the early 20th Century. I happened to choose this one because it seemed like a perfect generic starting point. Also, I was able to obtain an excellent high-resolution image for study from www.madeinbirmingham.org.
Research of the building was further aided by both Google Maps and Bing Maps: the building appeared in Google Street View and in Bing's Bird's Eye View, so I was able to study it from almost every angle—3,500 miles away! In particular, I was able to obtain excellent images of the external stairs on the far end, and since I had some Z scale etched brass industrial stairs from TrainCat, I made plans on building a set for the factory.
The model had to be designed to fit an odd space: one end of the rectangular building is truncated on an angle at the back edge of the layout. And so the project officially got under way with a paper template cut to fit the space. From there it was a matter of selecting etched brass windows of various sizes that would be assembled to suit the three visible walls.
At the outset, the process of making the windows seemed just a bit daunting. Consider: I had to precisely assemble 59 separate window parts to make 13 windows. Taking the "assembly line" approach made the job easier: I performed each step to all of the parts at once, rather than make one window at a time. Then I did the final critical step in small batches, working slowly and carefully. I knew that my patience would eventually pay off with dividends, since this building was all about those huge windows!
Granted, I'm modeling an abandoned factory, and things are pretty messed up. Look at the windows in the reference images—one might think that modeling flaws would not only go unnoticed, but might actually enhance the effect of being derelict. Why should I worry about being extra careful? The reason is that I've found modeling errors tend to look like modeling errors, instead of natural damage and decay. I believe the reason may be that, in real life, the windows started out as perfect, and acquired certain kinds of damage over time. Therefore, a model looks best when it too starts out as perfect, and is then carefully modified to reflect the kinds of damage seen in real life.
However, modeling old abandoned structures can be a double-edged sword: sometimes the process of creating deterioration can instead look like sloppy modeling! In addition, I've found that it's easy to overdo these effects; a subtle touch is needed to produce the most realistic results. The secret to success? Study real life examples as if you had to write a term paper about it.
As an aside, between the windows and the stairs, I have the feeling this may perhaps become the single most interesting-looking structure on the James River Branch—yet it will be located at the back of the layout! There's absolutely nothing I can do about this; it's just a consequence of a sequence of semi-random events over a period of several years, all subject to my whims at any given moment. The building was not part of the original layout plan; if it was, I would have improved its visibility. However, the non-ideal location doesn't constitute a reason to not build it! If nothing else, it will be an excellent modeling exercise that may serve as rehearsal for a much larger version for some future layout.
The first step in making the windows was to slice off the mounting flanges, using an ordinary pair of scissors, from the sides that will be joined together. After straightening the resulting curves (by far the most tedious step in the whole process), I cleaned up the cut edges with a fingernail file (my new favorite tool). I made a very simple jig—a brass bar attached to a scrap of PC board with masking tape—to keep the parts aligned during soldering.
Soldering was a matter of touching a solder-laden iron tip to the mounting flanges; liquid flux helped the solder wick along the joint between the window parts. After repeating this on the opposite side of the assembly, I sliced off all of the remaining flanges and cleaned up all four edges, as well as the front and back, with a fingernail file. The process was actually quite familiar; I'd utilized the same techniques ~12 years ago to model an accurate N scale fire escape using modified etched brass windows.
With all of these windows to assemble, I had quite a lot of time to think about things, and I noticed a curious phenomenon: the camera seems to cause models to gain weight—just like their human counterparts! The windows are impressively delicate and lacey when viewed in person, whereas they look somewhat chunky in the photos. I suspect this is due mainly to the fact that they're brilliant shiny brass; things will likely improve when they're painted a dark color.
Actually, I'd already decided in advance that I wouldn't paint the windows, as I feared it would add bulk; I planned instead to use Jax brown metal darkener. It's similar to Blacken-It, a product familiar to most modelers, but it's formulated to produce a brownish finish instead of bluish-black. After giving the windows a vinegar bath, I dipped them in darkener, rinsed them thoroughly in water, then gently patted them dry with paper towels. Finally, I sprayed them with Dull Cote to protect the delicate patina.
Because solder is affected by the darkener differently than brass, the finish was not "perfect." In this case, it suited the circumstances of a derelict building; if I was modeling new construction, I may have had to use some other technique to color the windows. At any rate, given the results, I was a happy camper who was ready to press on with construction.
Part 2 shows how I fabricated the superstructure, which is a relatively simple affair—at least in appearance...
This was one option for architectural style that I considered.

This was the architectural style I chose for the project.

This building is in an advanced state of decay, which I decided to replicate.

There are small shrubs growing in the top floor!

Notice the exposed plumbing on the side of the building.

The set of stairs on the other end of the building makes a great detail item.

A paper template is used to carefully plan how the windows will be arranged.

Mounting flanges are removed from the windows using a pair of scissors.

Only the edges that will be joined are trimmed off at this stage.

A simple jig helps hold the windows in alignment for soldering.

Solder is applied to the flanges, and it wicks along the length of each joint.

The process is repeated along the other side of the assembly.

All edges are now trimmed off, again using plain scissors.

A finished window assembly is cleaned up with a fingernail file.

The windows are colored using a chemical metal darkener.
![]()
![]()
![]()
![]()
Copyright © 2007-2013 by
David K. Smith. All Rights Reserved.
B.S.A. Works reference images courtesy of www.madeinbirmingham.org and used with permission.