East Theater, Part 2 of 2: The Building
Making the theater building was a difficult and costly process as I struggled to develop something that fit the image in my mind. The firehouse kit had the right lines and architectural detailing I sought, but it had to be made wider and taller to fit the marquee.
Wider wasn't difficult; the animated sign completely bisected the second floor and, in a stroke of luck, aligned perfectly with the sides of the window frames. The tougher challenge was making the building taller. The first time around, I'd made a patchwork quilt of wall parts that ultimately looked like, well... a patchwork quilt. Plus, some of the walls were badly warped because I'd used a blowtorch instead of a soldering iron (owing to the high heat-sinking effect of the large parts).
For my second attempt, I left the side walls pretty much as-is, and simply extended the back wall as needed to gain more width. Then, tapping my bottomless pit of scraps left over from the Front Street Bank, I raised the whole building by adding a stone foundation along the bottom. I also returned to my tried-and-true soldering techniques—this time using a brand new jumbo-sized soldering iron tip to better handle the large wall parts.
Assembly went like clockwork, and the shell was done before I knew it. This time I connected the front wall sections with beefy brass L-stock, instead of a wimpy strip of wire as I had last time, which wasn't strong enough to keep the parts aligned. To help hold the front of the building square, I also added a second brace near the bottom, which I made from fret material.
Disguising the connectors for the animated sign was an issue that didn't get addressed until the project was nearly done. At first I was going to build a substantial air conditioning unit, but it would have had to be unrealistically big to hide everything.
Then I thought about making a clock tower, since the building was originally the town hall, and this would be a plausible feature. I liked this idea so much that I'd gone as far as soldering together the brick tower walls. But it could only hide the connectors, and not the wires leading to them; I also felt that it looked somewhat awkward rising up right behind the animated sign.
Finally I struck upon the idea of making a peaked roof. This seemed to be the most effective approach, as it provided the greatest volume of hidden space—not to mention it would break up the monotony of the sea of flat-topped structures that dominated the town.
Originally the peaked part was going to be slate, but I switched to standing seam copper as I didn't have suitable material to simulate slate. I simulated the metal roofing with board-and-batten sheet styrene. This assembly was attached to a rectangular sub-roof bonded to the styrene wall caps.
To add even more architectural variety, and to break from a convention established by nearly every other Miller Engineering downtown kit, I removed the chimney from the side wall, and made an external chimney for the back wall. This was assembled from more stone wall material left over from the Front Street Bank, capped with a square of sheet styrene and a scrap of thin-walled brass tubing.
As per usual, I also made an ornate cornice from strip styrene. This one I embellished with some N scale styrene ladders sliced up to make corbels.
Finishing followed my normal routine of a vinegar bath prior to a base coat of primer, applied in a few light coats. After cutting a series of mad-complicated masks, the detail stonework was sprayed with Krylon Suede, the foundation and chimney with plain grey primer, and the cornice with flat white. The roof was brush-painted with a base of copper that was almost completely covered by an aqua-colored mix of gouache. The flat portions of the roof were brush-painted with Floquil Weathered Black. Brickwork received a wash of Doctor Ben's Driftwood Stain to highlight the mortar lines (and also help disguise the painting and masking flaws).
After some other assorted detail painting, including the wall caps and the top of the chimney, the final touch was to install a set of N scale etched brass windows (actually door transoms) from Scale Link for the openings over the marquee, which were sprayed white and glazed with frosted acetate. All of the remaining windows had been filled in with brick, which accelerated the painting process.
I had intended to make the theater look a bit run down and grungy, but the building came out so nicely that I decided to leave it in relatively good shape. Thus, weathering was quite light, consisting mostly of some chalk dust applied around the foundation, and an India ink wash for the roof.
Only when the building was completely finished did I install the marquee, which fit so snugly that it almost didn't need to be glued—but I secured it in place with CA all the same. Although much more work than anticipated, in the end the East Theater came out quite different—and significantly better—than expected.
But there was one last bit of unexpected unfinished business that turned out to be one of the most challenging tasks of the whole project: fixing the light leaks on either side of the animated sign where it passes into the building. This required installing a pair of styrene strips in a location that was never meant to be accessible. Ultimately I was unable to completely cure the light leaks, but I reduced them enough that I could at last consider the project finally and completely done.
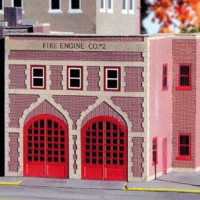
Two firehouse kits comprise the theater building.

Wall parts are prepared for assembly, along with a new stone foundation.

The parts are soldered together into a single piece, ready to fold.

The wall assembly is folded to form the building shell.

The tops of the two front wall parts are joined by brass L-stock.

An additional brace is soldered between the side walls near the bottom.

A new chimney is made from stone wall material left over from the bank kit.

The assembled chimney is soldered to the back wall of the building.
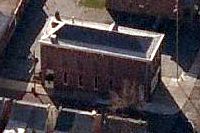
The new roof design approximates this example found in Pottstown, PA.

A sheet styrene sub-roof is installed to support the new peaked roof.

The peaked roof is made from board and batten sheet styrene.

After a vinegar bath and priming, detail painting begins.

The movie theater is now complete and ready for business.
![]()
![]()
![]()
![]()
Copyright © 2007-2013 by David K. Smith. All Rights Reserved.
Miller Engineering product photos used with permission.