
Cutting Micro-Trains Roadbed Track
With the very limited available selection of Micro-Trains sectional roadbed track products, track planning options are likewise limited. Cutting sectional track greatly expands your options—and it's not hard to do! That said, it's not just a matter of sawing a piece of track in two; both of the end connectors must be kept intact, which requires a special procedure.
What you'll need:
- razor saw
- small miter box
- small diagonal wire cutters
- flush cutters (rail nippers)
- liquid plastic cement
- small paintbrush
- sharp marking pen
- ruler (preferably flexible)
- protractor
- replacement metal rail joiner
Notes:
- You can substitute cyanoacrylate (CA) for the liquid plastic cement, but plastic cement is preferable.
- If you don't have flush cutters, you can cut the rail with ordinary diagonal cutters, but then you'll need to clean up the ends of the rail with a small file or fine sandpaper, which is a chore.
- The step that requires the diagonal wire cutters must not be done with flush cutters, as they can be damaged by it.
- You can get by without a miter box, but making square, perpendicular cuts is much easier if you have one.
- You can do without with the protractor assuming you're able to do some math.
- While it's possible to recycle the metal rail joiner, using a new replacement is recommended.
Everything you need can be found at a hobby shop or even a decent art supply store such as Michael's. Alternatively, it's also available online from Micro-Mark.
The process of making a shorter piece of sectional track begins by determining how much plastic roadbed must be removed. This is done by calculating the difference between the length of the uncut track and that of the desired track.
Example: You need a piece of straight track that's 3-1/4 inches long. A short straight section is 4-5/16 inches long. So, you need to remove 1-1/16 inches of the plastic roadbed.
Determining how much to remove from curved track parts is just a little more complicated. The most straightforward approach is to simply draw the arc using a protractor, ruler, pencil and paper. However, if you don't have a protractor, you can calculate the amount to remove using a flexible ruler and a little math.
Example: You need a 36-degree piece of R220 curved track. A full section of R220 is 45 degrees. You need to reduce it by 9 degrees, or 20%. The track part measures 6-13/16 inches along the centerline; 20% of this is about 1-3/8 inches—the amount of plastic roadbed to remove.
Next, you need to figure out where to cut the track. It can't be made in arbitrary locations; the cuts must be made on either side of the rail indexing pins (Photo 1). The idea is to eliminate that portion of the plastic roadbed in which the pins are located; this will allow the end part to slide freely along the rails.
One more note about where to cut: for the best cosmetic results, make the cuts between the holes under the rails in the plastic roadbed. This preserves the tie spacing, and you won't end up with partial ties. It may mean adjusting the length of the piece to remove by a fraction of an inch, but this tiny difference will not adversely affect a track plan.
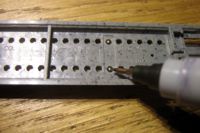
1. These are the indexing pins that hold the rail in place in the roadbed.
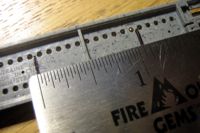
2. The roadbed is marked for the two cuts that must be made.
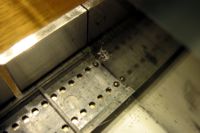
3. A razor saw and miter box produce clean, accurate cuts.
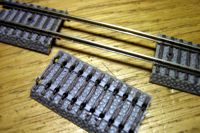
4. The piece of roadbed to be eliminated is carefully pried off of the rails.
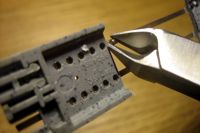
5. The track indexing pins are clipped off with diagonal cutters.
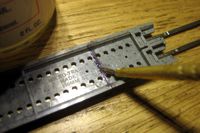
6. The roadbed pieces are bonded together with liquid plastic cement.
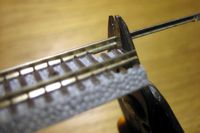
7. The excess rail is clipped off with flush cutters even with the roadbed.
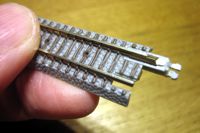
8. A new metal rail joiner is attached, followed by the plastic track joiner.
The first cut should be just to the side of the pins facing the end of the track; the second cut will be on the other side of the pins, separated by the amount to remove. Using the example, the marks will be about 1-1/16 inches apart. Indicate the cutting locations with a sharp marker (Photo 2).
Place the track upside-down in a miter box, and cut the plastic roadbed slowly with a razor saw (Photo 3). The idea is to cut the roadbed only, and not the rails. You can tell when you've reached the rails by the sound of the saw: it will get much louder as soon as it reaches the metal. When this happens, stop. You're done cutting.
Once both cuts are made, remove the waste portion of roadbed by carefully prying it away from the rails; it should come off relatively easily—just be sure not to put any stress on the roadbed parts you're keeping (Photo 4). Next, clip the two ball-shaped indexing pins off the bottoms of the rails with diagonal cutters (Photo 5). Be sure to wear eye protection when doing this, as the pins will shoot across the room at high velocity!
Remove the plastic track joiner, slide the end piece of roadbed snugly up against the other part, and brush on liquid plastic cement (Photo 6). When the bond is set, clip off the excess rail with flush cutters even with the end of the roadbed (Photo 7). Finally, replace the metal rail joiner and the plastic track joiner (Photo 8).
This completes the process. It sounds much more complicated than it really is, and once you get used to it, you can crank out a cut track part in less then five minutes. By the way, I find it helpful to mark the size of the track part on the underside of the roadbed with a sharp marker; this helps prevent confusion when you need multiple pieces that are similar in size.
Tip: You can use AnyRail software to determine how much roadbed to remove from curved track parts without any calculations.
Also see:
Copyright © 2007-2013 by David K. Smith. All Rights Reserved.