Website News Archive: October 2010
30 October 2010


 |
Today felt like a pressure cooker—modeling isn't all that fun when there's a deadline looming. Rising before dawn, I spent the morning doing as much grunt work as I could on the town, and managed to get the foundations in for the firehouse, cafe and the apartments; I also installed a half-dozen manhole covers in the streets. At noon I stopped everything and turned my attention to getting the train running. Cleaning the track and fine-tuning the rolling stock took a good three hours, after which I went to work on the electrical system to get a few token lights working, including the crossing flasher; I also installed the N scale layout in the hobby shop; it and the barber pole are rigged up with temporary battery supplies. I completed the installation of the sign on the bar, although it's not wired yet, and neither is the theater, which I'd hoped to get working. But I did finally finish the roof of the bar, since it's pretty much "in your face" with respect to its location on the layout. I even painted up a bus for the bus stop scene I created in front of the bar—one of those things that curiously just sort of happened almost on its own as I was adding people to the sidewalks. As the evening wore on, the hardest thing for me to do was to choose those things that would have the most impact on the final effect of the layout. At least there's no white Foamcore left anywhere, thanks to some dark grey craft paint. I'd anticipated burning some midnight oil, but I have to be up at 5:30 AM for the trip, so what's done is done. I hope to see some of you tomorrow in Timonium!
29 October 2010
With the first of two shows just a little more than a day way, I spent part of my Friday evening evaluating the layout to see where my limited remaining time and energy would be best invested. I decided to suspend work on the factory and focus on more important things, such as getting the layout in running condition. It hasn't been run since I shot this video in November of '09—almost a year ago! So I know in advance there will be quite a lot to do on that front. I also swore that I wouldn't show the layout again with any visible raw white Foamcore, so if I can't get a few key foundations cut and installed, I may simply go over the Foamcore with some paint. While painting doesn't bring these areas any closer to completion, it does create the impression of things being more finished. Also on my try-to-do list is to wire up some of the signs, particularly the theater, as that will likely provide the greatest visual impact. We'll see how far I get!
28 October 2010
 Work continues
apace on the abandoned factory. I don't know if it'll be done in time for the Timonium
show, but it ought to be close, and it will almost certainly be finished for the open house. It was touch and go for a while there—I ran out of the .080-inch square strip styrene used for the
columns, and there would not have been time to order more online (the only LHS near me closed a couple of years ago). Fortunately I had enough .040 x .080 strip stock to laminate together to make the one
last column I needed! What does strike me as a bit disconcerting is just how much work is going into such a simple-looking structure; based strictly on appearance, it looks as if it could be
built in a half-hour, not the three evenings so far...
Work continues
apace on the abandoned factory. I don't know if it'll be done in time for the Timonium
show, but it ought to be close, and it will almost certainly be finished for the open house. It was touch and go for a while there—I ran out of the .080-inch square strip styrene used for the
columns, and there would not have been time to order more online (the only LHS near me closed a couple of years ago). Fortunately I had enough .040 x .080 strip stock to laminate together to make the one
last column I needed! What does strike me as a bit disconcerting is just how much work is going into such a simple-looking structure; based strictly on appearance, it looks as if it could be
built in a half-hour, not the three evenings so far...
26 October 2010
 Work is officially under way on the abandoned factory.
I was really looking forward to this project since it presented a fairly significant scratchbuilding challenge, as compared with the majority of my other projects, which I'd characterize as
"scratch-bashing"—not quite scratchbuilding, but more involved than typical kitbashing. So far I've completed the window assemblies. However, I've just agreed to bring the layout to the
Great Scale Model Train Show in Timonium, so I have reason to step up the pace and get as much done as I possibly can between now and Halloween!
Work is officially under way on the abandoned factory.
I was really looking forward to this project since it presented a fairly significant scratchbuilding challenge, as compared with the majority of my other projects, which I'd characterize as
"scratch-bashing"—not quite scratchbuilding, but more involved than typical kitbashing. So far I've completed the window assemblies. However, I've just agreed to bring the layout to the
Great Scale Model Train Show in Timonium, so I have reason to step up the pace and get as much done as I possibly can between now and Halloween!
25 October 2010
Although I have no modeling progress to report at this time, I'm quite pleased to announce that Mr. Chris Miller of Miller Engineering (maker of Micro Structures etched brass building kits and Light Works signs and lighting effects) has expressed an interest in my modeling. With the next update of his website will come a photo gallery of several of my highly customized building projects. I've provided him with a series of "formal portraits" taken with my DSLR so that he'd have high-quality images to present. I'd like to thank Chris not only for making such wonderful products, but also for generously showcasing the efforts of his happy customers!
24 October 2010
 With only small blocks of free time
available for hobbies this weekend, today I wanted to complete some small project so I could have the satisfaction of finishing something. A very musty old round tuit was a fire escape for the
hotel. It turned out to be more involved than expected (which is par for my course!), but the result was worth the extra effort. The fire escape got its own new web
page.
With only small blocks of free time
available for hobbies this weekend, today I wanted to complete some small project so I could have the satisfaction of finishing something. A very musty old round tuit was a fire escape for the
hotel. It turned out to be more involved than expected (which is par for my course!), but the result was worth the extra effort. The fire escape got its own new web
page.
23 October 2010
 Breakthrough on the abandoned factory project! I struck upon the idea of making it an industry serviced by rail. Turns out it will be a simple matter
of adding a siding alongside the building. Obviously the siding will be non-functional, since it runs off the edge of the layout; this will be disguised by a fence and gate that's overgrown by
vegetation. I'm even toying with the idea of parking an abandoned freight car on the siding; if nothing else, it would be an excuse to try my hand at some
Tom Mann-style heavy-duty weathering. But the best part of the idea is that it imbues the layout with a little more railroad flavor,
something it lacks given that it's just a roundy-round with two small "token" bits of visible track. I've also settled on the architectural style; this happened when I
dug up my collection of Micron Art factory windows—the moment I saw them, I became convinced that the the building would be really eye-catching with many long banks of the delicate window frames.
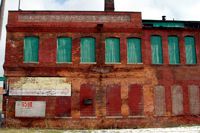
The B.S.A. Works image shown above is courtesy of www.madeinbirmingham.org.
Breakthrough on the abandoned factory project! I struck upon the idea of making it an industry serviced by rail. Turns out it will be a simple matter
of adding a siding alongside the building. Obviously the siding will be non-functional, since it runs off the edge of the layout; this will be disguised by a fence and gate that's overgrown by
vegetation. I'm even toying with the idea of parking an abandoned freight car on the siding; if nothing else, it would be an excuse to try my hand at some
Tom Mann-style heavy-duty weathering. But the best part of the idea is that it imbues the layout with a little more railroad flavor,
something it lacks given that it's just a roundy-round with two small "token" bits of visible track. I've also settled on the architectural style; this happened when I
dug up my collection of Micron Art factory windows—the moment I saw them, I became convinced that the the building would be really eye-catching with many long banks of the delicate window frames.
The B.S.A. Works image shown above is courtesy of www.madeinbirmingham.org.
As an aside, the most annoying aspect of brainstorms like this is having to revise the layout plan—this marks the eighteenth time. I'm reasonably confident, however, that it's the last. And here's what it looks like:

22 October 2010
 I figured that my good long streak of layout
progress was due to be interrupted by real life issues sooner or later, and it has, in a major way. All the same, I've still got a good solid month before the open house (see the note in the yellow
box above), and my goal is to have all Foamcore covered by something by then. Considering that I'm down to the area shown at right, I think I've got a good chance to complete the challenge—even
if I cheat a little and just slap some paint on it to hide the glaring white. Let's see what I accomplish this weekend; I've got some serious home maintenance issues to deal with, so I'm not
anticipating significant progress, but you never know.
I figured that my good long streak of layout
progress was due to be interrupted by real life issues sooner or later, and it has, in a major way. All the same, I've still got a good solid month before the open house (see the note in the yellow
box above), and my goal is to have all Foamcore covered by something by then. Considering that I'm down to the area shown at right, I think I've got a good chance to complete the challenge—even
if I cheat a little and just slap some paint on it to hide the glaring white. Let's see what I accomplish this weekend; I've got some serious home maintenance issues to deal with, so I'm not
anticipating significant progress, but you never know.
20 October 2010
|
Decisions, decisions... I remain undecided on what architectural style to use for the new factory building. It will either be classic plain brick (first example at right), or a "Model Factory" (that's the actual name of the architectural style!—second example at right) consisting of a reinforced concrete frame fitted with window and brick panels. I like them both about equally, and neither is substantially easier to build than the other, so it may be down to a coin toss to decide between them. I'm also toying with the idea of making it appear that the auto salvage was once part of the factory complex, but was split off at some point in time to become the office for the junkyard. I've always felt that giving things like businesses a history makes a layout more interesting. The B.S.A. Works image shown above is courtesy of www.madeinbirmingham.org.
19 October 2010
As promised, I created a clinic for sidewalks and foundations. Regular visitors will recognize the content: I simply regurgitated information from the What's New page in a more structured style. Since the entries will all drop off the What's New page next month, it's now preserved in a place everyone can easily find it.
In layout news, I haven't had enough time lately to get much accomplished, but I have done a lot of thinking. A few days ago I mentioned dropping the cemetery/park from the plan in favor of a more substantial structure, like a small manufacturing facility. The more I look at the town, the more I realize it's the right choice, especially after having finished the apartments; that building creates a nice anchor for the right end of the town, and the opposite end should have something with similar mass—I just need to find the right starting point for it to get going.
18 October 2010
Not much to report other than the fact that the population of Naughtright has grown by 20. I've also begun evaluating the placement of vehicles; I'm tempted to turn Front Street into a construction zone, where the pavement is being resurfaced. This provides me with an excuse to use some exquisite MMZ equipment, including a paving machine. And it creates justification for street barricades with flashing warning lights and other related paraphernalia.
17 October 2010
 Although it's no fun when my neck goes bad,
the layout often benefits: I'm not capable of doing the home renovation work I normally do on the weekends, but I'm still able to manage some low-key modeling. Whilst adrift in a
narcotics-induced haze today, I completed Heritage Crossing Apartments. Curious that a relatively complex kitbashing project was wrapped in only two days—I
think it just might be a record! Oh, and you're not imaging things—I renamed the apartment building.
Although it's no fun when my neck goes bad,
the layout often benefits: I'm not capable of doing the home renovation work I normally do on the weekends, but I'm still able to manage some low-key modeling. Whilst adrift in a
narcotics-induced haze today, I completed Heritage Crossing Apartments. Curious that a relatively complex kitbashing project was wrapped in only two days—I
think it just might be a record! Oh, and you're not imaging things—I renamed the apartment building.
16 October 2010
 A new example of "extreme kitbashing" is
well under way: Heritage Crossing Apartments. I refer to it as "extreme" because the end result is substantially removed from the starting point (the East Theater
is another example). In this case, what began as a Victorian house ended as an apartment building. The shell is complete, and assuming I'm not distracted by something else, I just might be
able to finish it.
A new example of "extreme kitbashing" is
well under way: Heritage Crossing Apartments. I refer to it as "extreme" because the end result is substantially removed from the starting point (the East Theater
is another example). In this case, what began as a Victorian house ended as an apartment building. The shell is complete, and assuming I'm not distracted by something else, I just might be
able to finish it.
15 October 2010
A tiny little bit of bad news... I brought the layout over to Rick Spano's so he and Linda could see all of the progress that's been made since the last time they saw the layout, which was a year ago during the previous Open House. While the James River Branch is a portable layout, it's not built for frequent transportation, and as a consequence it sustained some minor damage: the crossing shanty was knocked to the ground and broken, one of Álvaro Cortes's fine vehicles disappeared, and one of the newly-added downtown figures is among the missing—likely on the ground somewhere either at Rick's or where I live.
The lesson for me is this: if I'm going to be transporting the layout more frequently in the future, I'll need to find a way to prevent damage and loss. One thing I'm contemplating is making all of the structures easier to remove. This would involve a substantial effort for those buildings with complex lighting effects, as I'd need to make multi-pin plugs (the existing plugs are useless as they are buried deep inside the structure itself). I may need to go so far as to build a carrying case for it, since much of the damage it suffered was due to how awkward it is to carry. Alternatively, I may attach handles, although the shape of the layout limits the places where they can be mounted. But the bottom line is that I'll need to invest some time between now and the Open House on making the layout more durable for transport.
14 October 2010
 Although I've had almost no modeling time
for the last two days, I still managed to install four more streetlights and add the first people to the sidewalks of Naughtright. Adding figures to the town is like adding trees to scenery—it's an indication that I'm
down to the fine strokes, which is quite exciting. This also means there may be more mini-bios on the way. I know it's a stupid, silly thing to do, but I
think it's fun.
Although I've had almost no modeling time
for the last two days, I still managed to install four more streetlights and add the first people to the sidewalks of Naughtright. Adding figures to the town is like adding trees to scenery—it's an indication that I'm
down to the fine strokes, which is quite exciting. This also means there may be more mini-bios on the way. I know it's a stupid, silly thing to do, but I
think it's fun.
12 October 2010
After revising the maps on the plan page, I became more enthused to get started on the parking garage to go next to the bar. Alas, it won't happen; I hadn't stopped to measure the space up to now, and when I placed a few vehicles in the spot to see where the ramps might go, I discovered it was far too small for a parking garage. So, it will be a completely freelanced, kitbashed apartment house instead. But things didn't stop there... as I was revising the drawings of the plan, I got an urge to pop something into the space behind the cafe. I've no idea what it might be—laundromat, tailor, newsstand, deli, whatever—but it will be a small, single-story structure of some sort.
Then, just to keep the revisions flying, I decided to abandon the park project as well, which had just been moved from beside the bar to replace the cemetery. As I studied the town—which is now far enough along to study as a whole—I became concerned about the space where the park would have gone. Once upon a time there were some houses there, but I elected not to resurrect that plan because I concluded that the space needed a hefty visual anchor to balance the town's overall mass. I have a feeling that the right thing to put there would be a small, plain brick or stone factory or business of some sort. Surprisingly, I didn't have enough scraps left over for such a structure, so I may need to invest in either a new kit or in the raw materials to scratchbuild something. At any rate, I now have three new projects to complete that weren't on the list. Oh, well, good thing I love to model!
11 October 2010
 You'd think by now, what with foundations going in like gangbusters, I
wouldn't be contemplating changes to the plan. But I am. No, not to anything that's been "set in stone" up to this point, but rather to things yet to come, such as the mini-park. After completing
the foundation for the bar, I've been staring at the bar's blank back wall, and not liking the view. The building is the very definition of a sore thumb,
sticking up from the corner by itself, and the park simply wouldn't have enough visual mass to balance it. But while another building would solve the problem, whatever went there couldn't be as
tall, because it would block the view of the
firehouse and the cafe. So I'm thinking about resurrecting a prior idea I had for the space: a parking garage (you can
see this had been planned at some point in the past by virtue of the caption still visible on the layout in the photo). To add interest, I would model the garage as though it extended past—and
was truncated by—the
edge of the layout. Modeling the cross-section of a building is not an original idea, but I still think it would be a fun thing to do; one would get to see the ramps and such from the inside, which
would not be possible with a
fully-rendered structure.
You'd think by now, what with foundations going in like gangbusters, I
wouldn't be contemplating changes to the plan. But I am. No, not to anything that's been "set in stone" up to this point, but rather to things yet to come, such as the mini-park. After completing
the foundation for the bar, I've been staring at the bar's blank back wall, and not liking the view. The building is the very definition of a sore thumb,
sticking up from the corner by itself, and the park simply wouldn't have enough visual mass to balance it. But while another building would solve the problem, whatever went there couldn't be as
tall, because it would block the view of the
firehouse and the cafe. So I'm thinking about resurrecting a prior idea I had for the space: a parking garage (you can
see this had been planned at some point in the past by virtue of the caption still visible on the layout in the photo). To add interest, I would model the garage as though it extended past—and
was truncated by—the
edge of the layout. Modeling the cross-section of a building is not an original idea, but I still think it would be a fun thing to do; one would get to see the ramps and such from the inside, which
would not be possible with a
fully-rendered structure.
Meanwhile, I'm also having second thoughts about the cemetery. Such places are loaded with great little details to study, but this becomes a challenge when it's located the very back of the layout. My thought is to replace it with the mini-park—at which point the park could grow to a healthier size. It would mean losing the cemetery, but that's life. It reminds me of the stories movie directors tell about the final cut of their film: often there comes a point where a scene must be cut in order for the film to flow better, and many times this is one of the director's favorite scenes. It comes down to doing what's best for the art, as opposed to what's best for the artist. And so I may need to let the cemetery idea go. Perhaps I'll have another opportunity to model one in the future; it's an encouraging thought, at least.
10 October 2010


 |
Continuing up the street, I finished the foundation and sidewalk for the theater, which was a bit tricky since the theater entrance is nearly half as wide as the building front; this meant the sidewalk had to be sloped along one side and level along the other for a considerable distance, which kept me busy cutting, sanding and fitting for a couple of hours. Alas, successfully completing this challenge brought me face-to-face with a blunder: I goofed installing the curb along First Street, and didn't leave enough room for the firehouse entrance. It's not the end of the world, but it will require some extremely careful cutting and touch-up painting of the already-installed curb and sidewalk at the firehouse end of the theater.
That's when I decided to shift gears and tackle the tough one next: the bar, which sits on a narrow wedge between two streets on the steepest slope in town—and two different slopes at that! Turns out it was considerably easier than I thought. Originally I'd envisaged having to make steps and such to fit the building into the slope, but this wasn't the case; the key to solving the problem was thinking in terms of two horizontal planes that intersected at the entrance to the bar, thus establishing the height of the building foundation relative to the sidewalks. Once I was able to visualize this in my head, I then simply rendered the two planes in sheet styrene, beginning with a single piece. First, I cut the part to exactly fit the curbs; then I extracted the foundation from the middle, and reconnected the two parts at an angle such that the sidewalk met the bar entrance. It's much harder to describe than it was to build, so take my word for it—the piece went together with relative ease and speed. Which returns me to the firehouse. But once that's in, Emma's will come along for the ride as it's on the same level. And with that, all of the sidewalks will be done! Ye-haw!
9 October 2010

 |
With a hankering to keep the sidewalk and foundation momentum going, I tackled the next building on the street: the five and dime. From here on out, things will get progressively harder since every building is on a different level, due to the fact that the streets are all sloped. I did this for two reasons: first, it's rare to find an eastern town that's dead flat end to end—thus, slopes add realism and visual interest. And second, the town must clear the helix hidden beneath it, and if it was flat, the town would tower high above the river, which would strain believability (the retaining walls at the end of town are already a bit too tall for my liking). The first four buildings were a snap since the foundations and sidewalks were all one slab of styrene; for the rest of the buildings, however, the foundations would be level while the sidewalks follow the slope of the streets. It's a serious modeling challenge both because the outcome must be plausible, and because it involves a considerable amount of precise cutting, sanding and fitting. Doing the five and dime eased me into the process, since the slope there is fairly gentle.
7 October 2010
 The only progress to report is that two more streetlights have been
installed. However, I was doing a bit of image housekeeping and I came across an old photo of the first version of the layout (right) featuring a few of the
town buildings in their early stages, and that got me wondering about my projects. What was the first building I started for the layout? Well, this gets
tricky to answer because I can only go by photograph dates, since layout documentation back then wasn't as detailed as it is now. As far as I can tell, the
first building to get under way was Spano's Service Station, which is still in the works, so when it's done it will be the longest-running structure project
on the layout. It was a bit disappointing that, in an image dated 20 January 2007, it looked the same then as it does today, meaning the project has been idle for nearly four years! How
embarrassing is that? And just to add a touch of irony, right now it's the only building that doesn't at least have a coat of primer. So, it would seem that, by a strange twist of fate, the
first project started will likely be the last one finished.
The only progress to report is that two more streetlights have been
installed. However, I was doing a bit of image housekeeping and I came across an old photo of the first version of the layout (right) featuring a few of the
town buildings in their early stages, and that got me wondering about my projects. What was the first building I started for the layout? Well, this gets
tricky to answer because I can only go by photograph dates, since layout documentation back then wasn't as detailed as it is now. As far as I can tell, the
first building to get under way was Spano's Service Station, which is still in the works, so when it's done it will be the longest-running structure project
on the layout. It was a bit disappointing that, in an image dated 20 January 2007, it looked the same then as it does today, meaning the project has been idle for nearly four years! How
embarrassing is that? And just to add a touch of irony, right now it's the only building that doesn't at least have a coat of primer. So, it would seem that, by a strange twist of fate, the
first project started will likely be the last one finished.
Oh, and you're not imagining things—the home page had a subtle cosmetic facelift. Every so often I like to tinker with the look of things. The layout is still for sale, too; I just decided to tone down the message. To be honest, I doubt I'll be able to sell it given the five-digit price tag, and I can't realistically drop it any lower. But, you never know!
5 October 2010
 Getting a solid start on the sidewalks and foundations for four
structures at once also opened up an opportunity to shed some light on the street—namely in the form of streetlights. My clinic page on streetlights
has been sitting empty in anticipation of some content for quite a long time, and now I've been able to dust it off and give it a healthy start. Two down, ten more to go...
Getting a solid start on the sidewalks and foundations for four
structures at once also opened up an opportunity to shed some light on the street—namely in the form of streetlights. My clinic page on streetlights
has been sitting empty in anticipation of some content for quite a long time, and now I've been able to dust it off and give it a healthy start. Two down, ten more to go...
3 October 2010


 |
Another layout milestone has been achieved: sidewalks and foundations have begun. I started with the level area under the bank because it ought to have been the easiest to complete; however, it was both easy, being dead flat, and also quite challenging, since it fit a space surrounded by streets on three sides—including four storm drains. So it was a lot of iterative cutting, sanding and fitting.
First, I traced the space on a piece of paper by rubbing it with a pencil. The outline was transferred to a piece of .060-inch thick styrene sheet; I cut the shape just slightly oversize so it could be filed and sanded to fit the space precisely—I got my exercise for the weekend by standing up and walking from the workbench to the layout and back again a few dozen times.
With the styrene sheet shaped just right, I made the joints and cracks of the concrete sidewalks by scribing the styrene with a sharp knife held backwards. Next, I determined exactly where the buildings would reside, and made indexing blocks to hold them in place. Finally, I painted and weathered the part, and bonded it in place on the layout with contact cement. The finishing touches will be scratchbuilt fire plugs, mailboxes and other "street furniture."
Now it looks as though I'll finally have to add the handrails to the bank entrance steps, which I'd omitted back when the bank was still a background building. By the way, I completed the clinic on storm drains. Next, I suppose, will be one on sidewalks, curbs and foundations. These are exciting times!
2 October 2010


 |
With the house to myself for the weekend, I anticipate a considerable chunk of modeling will be accomplished. As it stands now, the streets of Naughtright are officially done: all of the storm drains and curbs have been installed. I noticed right away that the curbs and drains gave the streets a real sense of scale; I could picture myself walking around town. When the sidewalks are finished, I think Naughtright will at last take on a tangible quality. Incidentally, I'm working on a clinic for the storm drain construction, which I'll be adding to the website shortly.
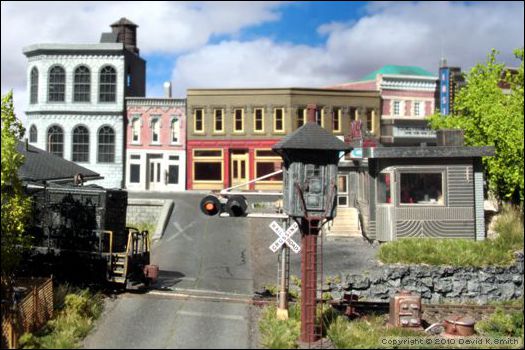
I also decided to take advantage of the gorgeous weather following in the wake of last week's troublesome rains, and hauled the layout outside for a photo session. With so many buildings done, or nearly so, I was anxious to see how things looked in natural light. It must have been a curious sight for the neighbors, what with the layout perched atop a garbage barrel... But I had to shoot quickly—the sun was blazing, and within minutes I could smell the layout getting hot. So there weren't as many good shots as I'd had hoped, but there are several decent new Gallery entries all the same—a sample shown below.
1 October 2010


 |
Wow, October already! Where did September go? Well, it may seem to have flown by, but it sure left its mark on the layout. The countdown is now on as to when the five and dime will be done. The exterior is nearly there, with only the signs left to do; the real heavy lifting will come as the work moves to the interior.
Meanwhile, the saga of the storm drains continued. After having completed nearly a dozen drain boxes in short order, the next challenge I faced was making the curb inlet parts. This had me scratching my head for a while, until I realized they were easily made using the same technique I'd used for the boxes; I simply repeated the process of making a channel-shaped part with the desired cross-section, then sliced off curb-width slivers with a Chopper.
From there on, it was all downhill. After bonding the curb inlets to the tops of the drain boxes, I brush-painted the box assemblies and the etched brass grates with Floquil Weathered Black. Then I bonded the grates to the boxes, and applied a liberal coat of Doctor Ben's Weathered Rust. Because this rust patina easily rubs off, the drains were sealed with Dull Cote.
The final step was my "secret ingredient." To give the grates the look of old worn metal, I rubbed graphite powder onto them with a small, stiff brush. At that point, the drains were ready to install on the layout in slots I'd pre-cut when making the streets.
![]()
![]()
![]()
Copyright © 2007-2013 by David K. Smith. All Rights Reserved.