![]()
Water Main Backflow Safety Valve
In real life, these valves prevent water from a fire hydrant system—which is non-potable—from returning into the main water supply. In the hobby world, they make for a great little detail. MakeMyModel (now defunct) offered one of these nifty details in Z Scale, and I was looking for an excuse to use one for quite a while.
Ultimately I found a nice spot for it in the weeds at the front edge of the layout, across the street from the crossing shanty. Being subject to close examination, however, meant improvements were in order: the lumpy, solid disks that were supposed to be the valve handles needed to be replaced with something more like the real thing. Pulleys from a ship's freight hoist kit were just what the doctor ordered.
Step one was to make a foundation. The ground was on a gentle slope, and I thought it might look odd having the valves sprouting out of a grassy hillside. So I made a styrene "box" with a recessed "lid" into which the valves and some gravel would go.
Step two was to finish the valves. The rapid prototyping material used by MakeMyModel has a waxy surface that's difficult to paint. I've found that thoroughly cleaning it with rubber cement thinner and a stiff brush is effective. After attaching the ship pulleys, I painted and weathered the valves.
Step three was to make a fence. I was about to scratch-build one when I came across a gorgeous Z scale etched nickel fence set from Hugwa & WiygN (#220000968) in my bottomless pit of etched metal kits and details. A single length of fence was simply bent at its posts, which were installed into holes drilled in the foundation part. (By the way, here's a seriously bizarre thing that happened: I completed the foundation before finding the fence, and I used totally arbitrary dimensions based on what looked good. And... the fence exactly fit the foundation!)
Step four was to install the valves on the foundation, and bond a layer of track ballast in place with a few drops of cyanoacrylate.
Step five was to apply final weathering, particularly to the fence. In order to avoid plugging the nearly-microscopic holes, the lightest wisps of rust paint were dry-brushed onto the fence.
Step six was to excavate an opening in the layout scenery with a sharp knife, and glue the assembly in place.
Step seven was to admire!
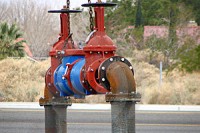
Water main backflow safety valves can make for interesting, colorful details.

Here's a before-and-after of the valve handles.

A foundation is made from sheet and strip styrene stock.

The parts are painted, assembled and weathered.

A hole is cut to accept the finished detail assembly.

The assembly is set into a blob of glue in the hole.
![]()
![]()
Copyright © 2007-2013 by David K. Smith. All Rights Reserved.