Working with Rokuhan Switches, Part 1: Control
Rokuhan Z Scale roadbed switches are marvels of engineering. The fact that the switch machine is built into the roadbed is remarkable in itself; however, there's far more to it than meets the eye. The more you know about them, the more powerful and versatile they can be. This comprehensive clinic has four parts: this part shows how to control them; Part 2 details what power routing means to layout design; Part 3 shows you how to notch track that's connected to the switch; and Part 4 details the process of making them non-power routing.
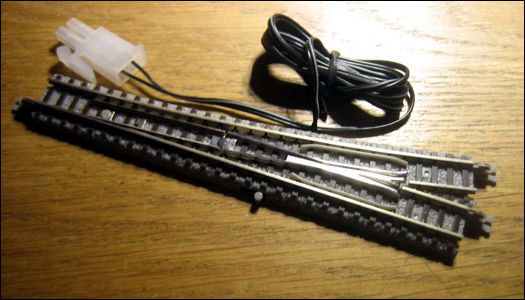
The Rokuhan switch is rather unassuming in its appearance; it even has a manual actuating lever on the side. The only thing that belies the fact that it's got a switch machine inside is the wire connected to it. Otherwise, it looks just like the more familiar Micro-Trains manual switch.
A Look Inside
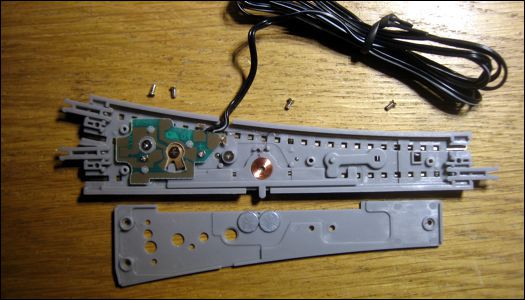
One of the first questions that likely pops into a modeler's mind when they see a Rokuhan switch for the first time is, how does it work? How did they cram so much stuff into such a tiny space? Well, for the terminally curious—and especially for the timid, who would never trust themselves to open one up—this is what you'll find:
Here's how they work: a single flat electromagnetic coil is mounted in a long slider bar. It's directly adjacent to a pair of rare earth magnets mounted in the cover plate; the magnets are oriented with their poles facing in opposite directions. When the coil is energized in one polarity, it's attracted to one magnet, pulling the slider bar in one direction; when the polarity is reversed, it's attracted to the other magnet, pulling the slider bar in the other direction. The coil need only be energized for a split second in order to move the slider.
One end of the slider bar engages a lever that moves the points. The other end engages an electrical switch that controls the polarity of the frog, and directs track power to the two routes according to the switch position (the switch is Power Routing, as opposed to Power Everywhere—more on what that means in Part 2). To keep the points firmly positioned, the magnets attract one of two small steel indexing pins embedded in the slider bar.
Here is a close-up of the mechanism:
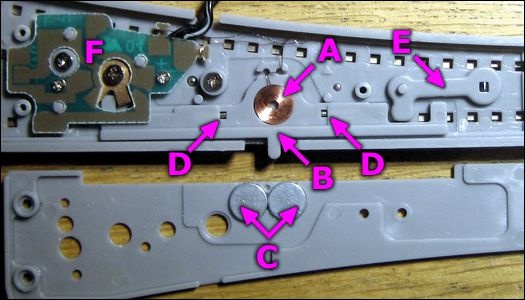
A electromagnetic coil
B slider bar
C magnets
D steel indexing pins
E point actuating lever
F track power switching circuit
One Coil, Not Two
The fact that this switch machine has a single coil makes it different from almost every other kind of switch machine. Most switch machines (including the Micro-Trains Micro-Track switch) have two coils that move a metal rod linked to a slider—a relatively ancient design.
The Rokuhan switch is based on a newer design; it has just one coil that moves a slider, and a pair of fixed magnets to attract the coil when energized. Not only does this make the machine smaller and simpler, but it also means it's controlled differently.
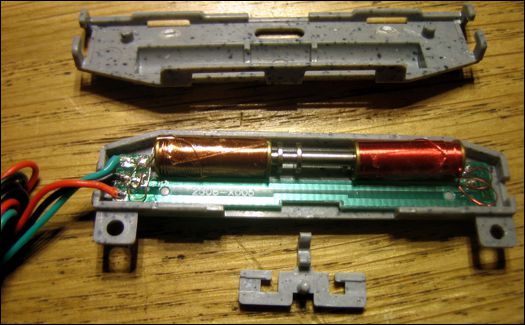
All twin-coil switch machines will have three wires: one each for the two coils, and one common return for both. You can see the coils and wires in the image above showing the guts of a Micro-Track switch machine. They work best on AC power. They can be actuated with a pair of pushbuttons, a SPDT (single-pole double-throw) center-off momentary contact toggle switch, or a variety of other specialty products such as Atlas switch controllers.
Single-coil machines have only two wires. They will work only with DC power; they can be used with AC, but this requires some simple electronics—I'll show you how later on. Aside from Rokuhan's own controllers, the most common way of actuating them is with DPDT (double-pole double-throw) center-off momentary contact toggle switches. They can be actuated with pushbuttons, but this requires some simple electronics—again, I'll show you how later on.
IMPORTANT: The key point to remember with track switches that have coils (single or dual) is that the coil must be energized only for a split second. If left energized any longer, it will burn out. This is why the control must be momentary contact.
Plug-and-Play or DIY?
Rokuhan switches are part of a complete track and train control product line. Their throttle has built-in controls for two switches, and they offer add-on modules to control additional switches. It's literally a plug-and-play system that requires no understanding of electronics whatsoever.
However, you may understandably want to use a throttle of your own choice. In this case, Rokuhan will soon be introducing stand-alone switch controllers. In the meantime, you must be prepared to cut and solder wires to control the switches (which you would have to do with Micro-Trains switches anyway). On the positive side, you still won't need to understand electronics; if you can follow instructions and make the necessary connections, that's all you'll need to do.
Switch Control Power Supply
Bear in mind that switch control and train power supplies are two independent systems that must be kept separate; you cannot use the output of your train throttle—that is, what gets connected to the track—for switches. Some "power packs" will have an "accessories" output; this is almost always AC, and unless you know exactly what you're doing, this cannot be used to control Rokuhan switches.
For DIY switch control, you'll need a power source. Rokuhan switches work fine on 6 volts DC, and they'll actually function on as little as 3 volts DC! You have two options: a transformer such as a "wall wart" rated for 6VDC, or a battery pack having four 1.5-volt cells (use rechargeable batteries to help reduce the landfills). A battery pack is a good option for small portable layouts where you're likely to be using a battery-powered throttle.
Wall warts are available at Radio Shack or even Target or Wal-Mart; plus, there are plenty of online sources. You can get a battery holder to make your own battery pack from any number of surplus electronics supplies. Parts sources are provided at the end of the article.
Toggle Switches and Wiring
The specific switch you'll need is a DPDT center-off momentary contact toggle switch. Aside from the power supply, it's the only component required to control a Rokuhan switch; sources are provided at the end of the article.
The wiring is not complicated. In fact, if you're familiar with throttles, then you'll recognize the basic circuit as a direction (polarity-reversing) control. The easiest way to figure out which way to attach the wires from the track switch is to use clip leads to temporary connect it to the toggle, and test it before soldering; if it's wrong, just reverse the connections. (Or, you can rotate the toggle switch 180 degrees.)
Using Pushbuttons
There's an option to use pushbuttons instead of toggles, if you prefer; it's really quite simple. The trick is to use a 12 volt AC power supply (yes, AC and not DC), and connect a single silicon diode to each pushbutton. For each pair of pushbuttons, the diodes face opposite directions. That's it.

Here's the secret of how it works: the diodes convert 12VAC into ~6VDC (half-wave, for the techies reading this). Each pushbutton connects one of the two diodes to the circuit, delivering alternate polarity to the switch coil. (Pressing both buttons accidentally does no harm; it just sends AC to the switch, which will simply buzz. You don't want to do this for very long, however.)
This is actually a cheaper alternative to using toggle switches: the required toggles run about $4.00 each, whereas pushbuttons can be had for $1.00 or less each through surplus, and general purpose silicon diodes are ten cents each. The wall wart power supply will be about the same cost in either case.
The Manual Option
Even though the Rokuhan switch is powered, it can still be used manually. The lever on the side works the same way as the corresponding lever on a manual Micro-Trains switch. In fact, you don't even need to connect the wire to anything in order for the switch to work properly; the power routing feature will still work—more information on what power routing means is provided in Part 2 of this clinic.
Parts Sources
For the most part, gone are the days of Radio Shack and similar stores where you could get all manner of electronics goodies; Radio Shack is basically little more than a cell phone store nowadays. There may be a few independent shops still hanging on, but they're few and far between. So our only reliable parts source is online, and thankfully there are plenty of choices. Here are my personal preferences:
- All Electronics — an electronics surplus house with an extensive and variable catalog of merchandise
- Digi-Key — a huge distributor of electronics merchandise to the industry, with a mind-boggling product range; next-day shipping and world-class customer service
- The Electronics Goldmine — surplus electronics and widget retailer, thus their stock will change over time, but you can find some great deals there
Need help finding the toggle switch? While there are many sources and options that will work, you may prefer a guaranteed correct item ID to eliminate searching or possible errors. Here is a direct link to exactly what you need:
More Information
To learn more about working with Rokuhan switches, please continue with Part 2.
![]()
![]()
![]()
![]()
Copyright © 2007-2013 by David K. Smith. All Rights Reserved.