6.2. Operation
Admittedly I'm a roundy-rounder by nature, and this layout couldn't be any more roundy (ahem). At any rate, I did design it with the idea of being able to operate it, should the spirit move me on that rare occasion.
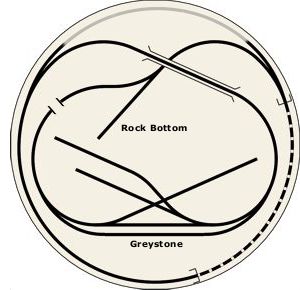
For the sake of operation, we assume that the line is point-to-point, from Greystone to Rock Bottom. In order for this to work, the line to the left of Greystone ends halfway around the curve (as shown at right), and is treated as the tail end of the runaround. Then, at Rock Bottom, that same line ends in an abandoned quarry area, and is used for storing and swapping flatcars. Finally, the portion of the outer loop that bypasses Rock Bottom is ignored.
Typical operation is quite rudimentary: a pair of loaded flatcars is swapped with empties at each end. Since there's no runaround at Rock Bottom, empties are shoved the length of the line (which was not unusual in real life). In addition, a mixed train consisting of two boxcars and a combine circulate the railroad as required.
Caveats: Loads must be transferred by hand from the flats at the cutting shed in Greystone to the flats in the quarry; otherwise, it would look a little silly returning loads to the quarry. Also, all switches are thrown by hand, and uncoupling must be done manually.
Realistically, though, 99% of the time I'd just run a train around the outer loop continuously with one Shay, and piddle around in the yard with the other. Unfortunately the project ended before I could finish the layout, so nothing ever came to pass.