
A Classic Tower Made More Classic, Part 1 of 2
a.k.a. "Enhancing an N scale tower"
It's a Catch-22: I'd prefer scratchbuilding structures, but I lack the time to do so. On the other hand, I'm reluctant to plop straight-out-of-the-box kits on my layout, as it fails to impart a sense of originality. Owing to a dearth of inspiration, my Dimi-Trains Classic Tower kit sat in its box, unassembled, for years.
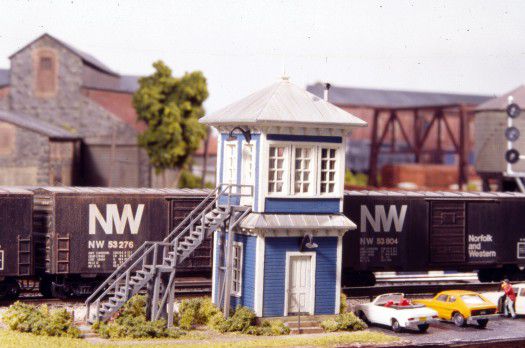
Then, while digging through some old slides looking for station detail ideas, I came across a photo of a tower taken about 20-some years ago when I used to commute by rail from Princeton to Manhattan. While I've long since forgotten where the tower was located, the image nevertheless provided a useful reference for modifying the kit.
The following account details what I did; you can follow along, or use it as a starting point for your own unique version.
Walls and Woodwork
Carefully separate the kit parts from the sprues, and remove the flashing. Trim about 1/4-inch off of the tops of the first floor walls, and carefully scrape away the cast-on trim parts that extend above the doors and windows.
Remove all of the woodwork detailing from the second story walls. To do this, secure a piece of fine sandpaper to a flat work surface and sand the walls smooth. Then, using a steel rule, scribe in siding lines to match the first floor walls with an X-Acto knife held backwards. Finally, enlarge the appropriate second story window into a door opening.
Figures 1A & B show all of the modifications to the walls and the placement of new woodwork. Attach all strip stock parts except the .020 X .020 window sills; using fine sandpaper secured to a smooth work surface, lightly sand all of the woodwork smooth and flush, and then add the window sills. For the new second story door I modified a spare from a Model Power General Electric building kit. Be sure to leave a gap for the stair landing.
Figure 1A: Wall modifications
Figure 1B: Wall modifications
Roof Modifications
On both roof parts install .060 X .060 strip styrene fillers where the walls would have met the roofs if assembled normally, then sand the undersides flat. Attach .010 styrene sheets and trim flush with the outer edges. Then add additional sheet parts to the roof parts as shown in Figures 2A & B. (If you want to illuminate the structure, make provisions for the lighting as you assemble the roof parts.)
Figure 2A: Second story roof modifications
Figure 2B: First story roof modifications
Scribe lines into the roof undersides from corner to corner to aid positioning the walls. Bond the wall and roof assemblies together. Make a second story floor from Evergreen .020 V-groove sheet stock, cut to fit inside the second story walls, and secure it to the first floor roof.
Figure 2C: Positioning aid
Despite their small size, the corbels are relatively simple to make. Drill fourteen 3/32-inch diameter holes in a plain .020 styrene sheet. Cut out a .160-inch square around each hole, then quarter the squares to produce the finished parts—see Figure 3. Each of the eaves receives seven of them, spaced two scale feet apart (refer to Figures 1A & B for placement).

Figure 3: Making corbels