
Problem Solving
Design Issues
The most challenging areas of the floor plan, odd as it may seem, were the bathroom and closet/laundry doors; their placement and orientation became a design puzzle.
|
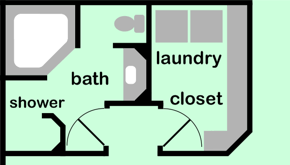
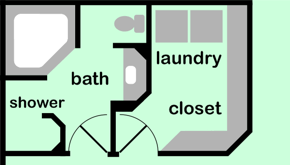
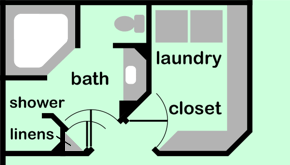
Option A (top left): The "traditional" approach would be to make a short hallway, with doors on either side, and in fact my very first draft was done this way. But a hallway is a space pig—look at how much of the closet gets eaten up, not to mention the open area behind the closet door obliterates the recessed portion of the entertainment center. Option B (center left): Doing away with the hallway and just making the doors flush with the living space wall is better in terms of space utilization, but it pushes the bathroom door closer to the bed, which is a bit awkward, as is the shape of the passageway into the closet. Besides, the long, flat living space wall (along the bottom) is kind of boring. Option C (bottom left): Orienting the two doors at 45 degrees to the living space wall, and at 90 degrees to each other, utilizes the space more efficiently, creating enough extra room for a little linen closet right behind the bathroom door; the bathroom also feels more spacious since the closet door isn't pushing into it. Furthermore, it looks more interesting than either of the previous options (below), opens up the area around the bed a little, and creates a symmetrical shape around the entertainment center. |
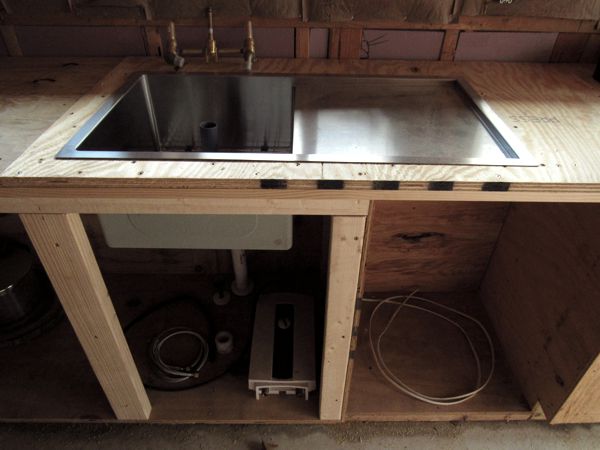
The kitchen went through many changes during its design, and several more even as I started the framing. In my final draft for the architect, a "skinny" refrigerator stood side-by-side with a small wall oven at right angles to the countertop (below left). But when it came time to start building it in June, I found that it was actually unbuildable as drawn owing to small changes I'd made in the foundation dimensions. It was just as well, as I never liked the fact that the side of the refrigerator would be left exposed, and the refrigerator itself wasn't a preferred model.
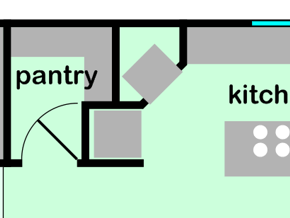
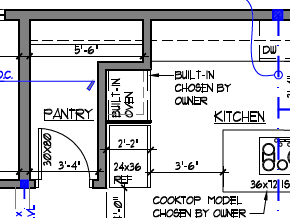
After downloading the dimensions of several "normal" refrigerators and wall ovens, I found that everything fit perfectly if I placed the oven at a 45-degree angle between the refrigerator and the countertop (above right)—in fact, it was downright spooky how everything fit so perfectly. That the wall oven angle reflected a design element prevalent throughout the house made it an ideal solution in every respect; plus, the side of the refrigerator is now enclosed and, as a bonus, the pantry shape is more practical.
Then, on 22 January 2019 I began framing cabinets in the previously unused spaces in order to improve the efficiency of the kitchen.

Meanwhile, more problems emerged from other changes I made to the kitchen. In the original design, there were two windows and a breakfast bar set at 45 degrees, whereas in the as-built kitchen, there are three windows and a right-angle breakfast bar. In the process of the redesign, I moved the dishwasher from the left side of the sink (below left) to the right side (red square, below right). Both positions had issues: in the former, the dishwasher was directly adjacent to the island, which was awkward; in the latter, it was under part of the sink, which was worse.
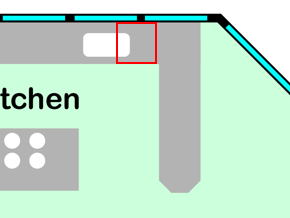
I could have shifted the sink to the left, but then it would be smack in front of a column between the windows, and centering it under the far left window was out of the question. On this occasion, my aesthetic sense overrode my practical sense, and I kept it centered under the middle window. But how could it coexist with the dishwasher?
The answer was to switch from a double-basin sink to a single-basin one with a drain board (above), which clears the top corner of the dishwasher. As it happens, I like this type of sink better, so it's win-win.
Construction Issues
Building a house all by myself was a challenge I've looked forward to for most of my life, and one that I've also been preparing myself to face, so it wasn't at all frightening or daunting, in spite of the fact that it was by far the single biggest project I've ever undertaken. It did, however, present some physical challenges, and one of the first problems I faced was handling large objects; for the most part I simply had to build up my strength and stamina, little by little. As an example, going into the project, picking up a twelve-foot-long two-by-four was a strain; by the time the framing was done, I could easily handle a 28-foot-long two-by-twelve.
My first big hurdle was the ridge board for the garage roof. I could just about lift one end of it, so I dragged it into the garage. I located a stepladder at each end of the garage, and placed one end of the ridge board on the highest rung of a stepladder I could manage. I repeated this on each end alternately until both ends were atop the wall framing. Then I placed each end into a pre-assembled support that held it in its final position, and secured it in place.
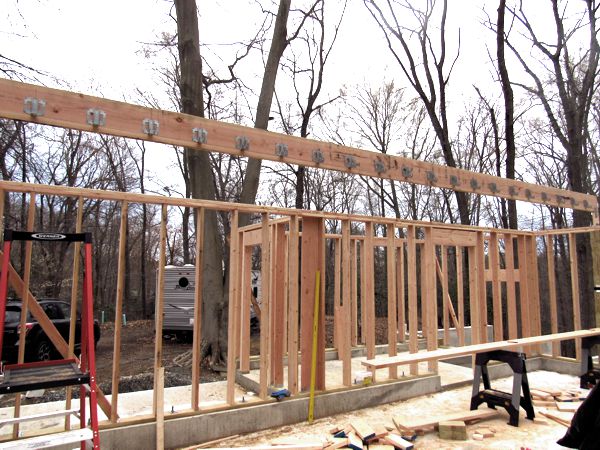
The garage roof rafters were nearly as challenging, although I could handle them a little better. I'd place one end on top of the garage wall, then shove it toward the center until it was perfectly balanced on the wall. Then I'd move inside, climb up on a stepladder, and drag it the rest of the way into place. One thing that also helped this process was plenty of rest: after I installed each rafter, I stopped to take a photo of it. This kept me going at a steady but relatively gentle pace that prevented me from straining myself or becoming exhausted too quickly.
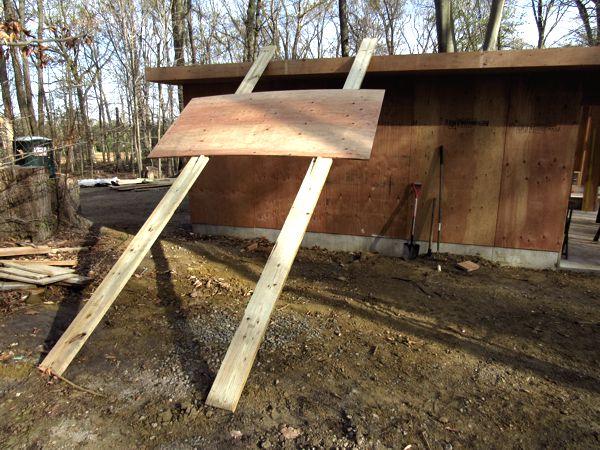
One step that at first seemed truly daunting was the garage roof sheathing. Four-by-eight-foot sheets of ¾-inch exterior plywood are massive things I could barely lift even at my best. How was I ever going to get them up onto the roof? I solved the problem by making a ramp from a pair of two-by-eights, to which I attached wedge-shaped slices of lumber to act as slide locks. I'd wheel a sheet of ply into position on a hand cart, and drop it at the bottom of the ramp. Then I'd shove the ply up the ramp a few feet at a time, setting it against the locks to keep it from sliding back down. One last push got the sheet onto the roof, and from there it was relatively easy to shift it into place. This might not have been possible, however, had the roof pitch been much greater than the gentle 1/12 I'd chosen!
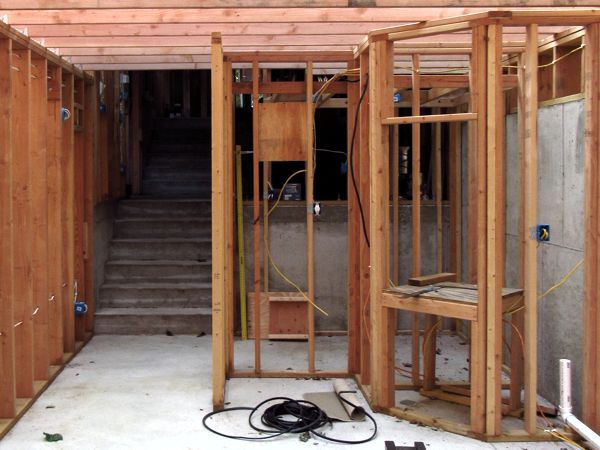
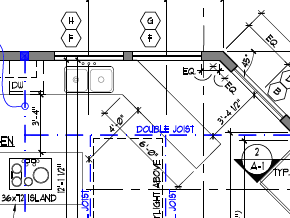
The ceiling joists of the living space presented a unique challenge, not because they were difficult to handle, but because they posed a purely aesthetic conundrum I had to solve. I'd planned on having a freestanding wood fireplace in the center of the wall of windows since the beginning. The problem was the flue: if there was a beam down the center of the ceiling, the flue would have to jog to the left or right on the way up, and this was visually unacceptable to me.
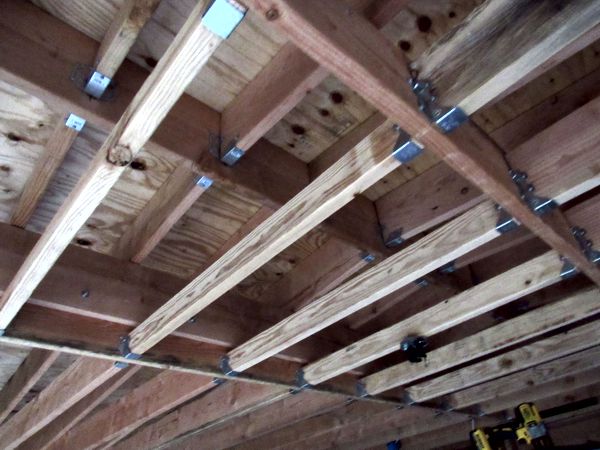
The solution was to run two beams across the ceiling, one each to the left and right of the center, to allow the flue to run straight up through. It would still need to jog to one side in order to avoid the ridge beam, but this would take place in the hidden space between the ceiling and the roof (below).
It may look strange, but it's actually stronger than it might have been if built more conventionally: instead of just one beam across the span, there are four—the two beams are doubled, and directly contribute to the support of the roof. Given the roof's 1/12 pitch, I considered the extra support a prudent step. Deflection at the center is less than half of the acceptable limit.
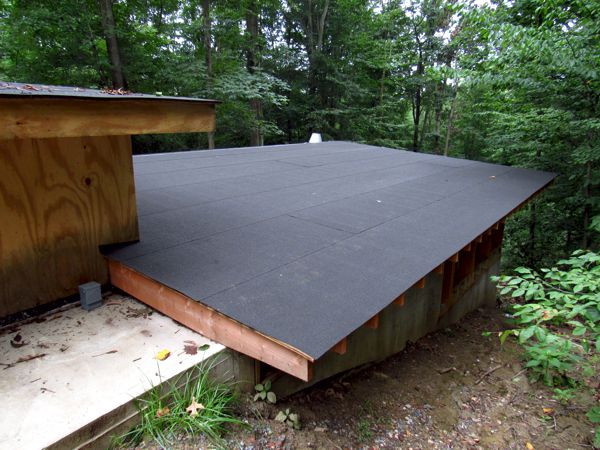
The roof itself was a big problem overall, since I knew it would be some time before it could be clad in steel, as planned. The solution was to use a roofing material, which was designed to help prevent ice build-up along eves, as a temporary roof (an acceptable alternate use of the product). The material is self-adhesive and comes in rolls, making it a snap to install.

Owing to the commercial property debacle, the temporary roof had to survive far longer than expected—over two years, instead of just a few months—but thankfully it held up surprisingly well.
There were plenty of additional challenges I faced along the way—perhaps none so frustrating as the battle for electricity.