The SmithCam*
Back in the day I was heavily into science fiction films and, in particular, special visual effects (still am, actually). Being on the wrong end of the continent, however, I wasn't able to apply for a job at Industrial Light and Magic, which would have been a dream come true for me. I was instead able to work for a tiny computer animation company in Manhattan, which then led to an interest in special effects photography.
 Given that this was the
early 1980s, which predated photo-realistic CGI, the only way to do this type of photography was with a camera, film, and
an animation stand, such as an Oxberry. Costing tens of thousands of dollars for a medium-sized four-axis stand (right),
it was obviously not an option for me. What made them so costly? For starters, they were enormous: the artwork moved on
a large stage in the X, Y and theta (rotational) axes, and the camera moved on a long column in the Z axis. All movements
had to be precisely controlled for repeatability.
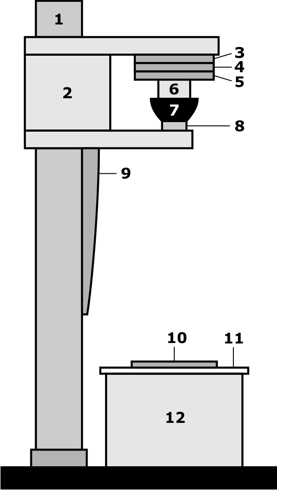
So I decided, if I couldn't buy one, then maybe I could build one. I had an idea how to make it much more affordable: turn the whole machine "upside-down." Rather than move large artwork across large distances, I'd move the camera body across a stationary lens over small distances. Also, I realized I didn't need to use a fancy modified 35mm SLR camera body; I could design my own that was far simpler and cheaper.
Except for the camera body, which I had a local machine shop fabricate, I built everything by hand, at a cost of just a couple thousand dollars.
 |
|
I used ultra-accurate Swiss geared motors (several hundred dollars each new, less than $5 each surplus) to move the camera body in the X, Y and theta axes. The camera platform was mounted to a carriage that rode along a piece of 4-inch copper pipe for the Z axis; the carriage also held a flat-field lens, and a special track arm moved the lens to maintain focus regardless of vertical position. The artwork was placed on a sheet of translucent white Plexiglas attached to an aluminum bucket that housed a set of homemade flash heads. I shot back-lit artwork exclusively: much cleaner-looking, cheaper to produce, and loaded with options for special effects. Nominal artwork size was ~5 x 7 inches. Overall system size was roughly half that of a comparable Oxberry stand.
It took about a year to finish the camera. Fortunately, I quickly found a client who kept me so busy that I didn't need to work for anyone else. On average I did two jobs a month, each of which would take about three days working around the clock. The jobs were nearly always rush, which earned me a 200% markup on high-end point-of-sale or convention projects for the likes of UPS, J.C. Penny and others. It was enough to sustain my studio for years.
At my peak, I was producing images that had professionals scratching their heads: how was I making them? I did a lot of experimentation with filters: I took transparencies of things like brushed aluminum, polished woodgrain, leather and whatnot, then added various color filters for unusual texture effects. I also did a lot of complex layering to create photo-realistic drop shadows, reflections, glints, and other special lighting effects that may be mundane and trivial to do on a computer today, but were exciting and challenging to do optically back then.
I discovered that placing a thick diffuser between two identical negatives imbued otherwise totally flat artwork with a rounded, almost three-dimensional quality. Indeed, it was gratifying to see that, a few years later, this quasi-3-D technique was employed in the film Who Framed Roger Rabbit. I am not claiming they stole my idea; they legitimately invented it on their own. But I probably could have helped them out if I was working for them!
I was seriously considering getting my invention patented, except... my timing was off. Computer imagery was just beginning to take over the industry, and before long I had to close my studio. Curiously, I never took a photograph of the camera. But, even if I had, it would have been thrown out along with all of the sample images I'd collected. And the camera itself? I dismantled it, kept all of the motors and gears for my model animation projects, and trashed the rest, with no regrets: it earned me enough dough that I could work one week a month and completely renovate my home. Not a bad return on my investment.
*Not its name—in fact, I never named it.
